The plan this weekend was to do that 70’s classic, a Blackforest Gateau, though I prefer the name Schwarzwaldtorte as it is sounds much more exotic. It is a much maligned piece of deliciousness if done properly but it needs the right ingredients, particularly the special sour cherries which are not easily available in the UK. Unfortunately I couldn’t find them in any Uk websites, so thanks to amazon.de they are now on their way from Germany without the benefit of my Amazon Prime membership, so for this weekend I had to change tack a little.

I am determined to push myself a little since the rather quiet baking autumn (damn that work thing), and there are a few things I have been meaning to do for a while. Chocolate tempering has long been on the list and I have admired chocolate collars on cakes forever. Added to that I have never candied any citrus fruit and with 3 oranges sitting in the fruit bowl, I decided to try something which combined all 3.

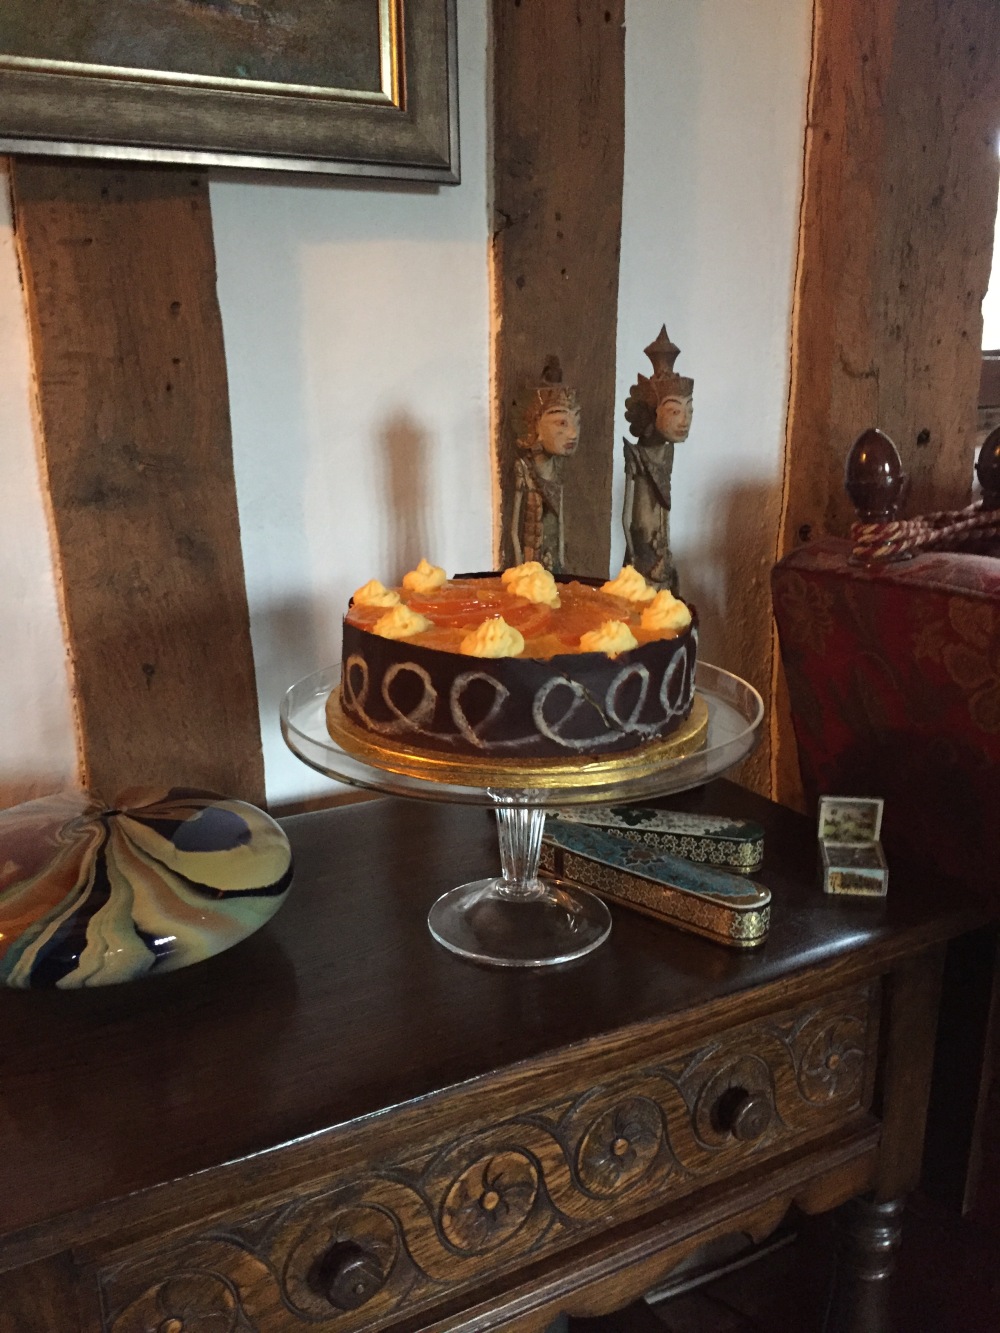
The result was this delicious though less than perfectly executed Chocolate Orange Cake, partly inspired by another recipe but with the chocolate content reduced (I am not keen on full chocolate cakes), and the orange content increased. It is a chocolate genoise sponge, sandwiching orange German buttercream, topped off with candied oranges, and wrapped in a tempered chocolate collar. Time consuming? Yep! Room for improvement? Definitely – especially the design on the collar! Lots of lessons learnt? Certainly! Delicious? Absolutely!
So let’s go though the elements.
The chocolate genoise sponge first. I love genoise sponge. It is so fluffy and light and far less complex to make then everyone thinks. The key is the level to which you must whisk the eggs and sugar together until they are thick and glossy and flow off the whisk in thick ribbons. Other than cutting it evenly, this was the one element of this bake I was thoroughly comfortable with. I had however forgotten it tends to be a little dry and would have benefited from syrup being soaked into it, which annoyingly I had a wonderful and unused source from the candied oranges.

The orange German buttercream next. German buttercream is much lighter than the anglo-saxon variety and similar to creme mousseline but with a higher butter content and a firmer set. The basic technique is to make a creme patissiere and then whisk in vast amounts of butter to make a light fluffy cream. The fruit varieties use fruit juice instead of milk for the creme patissiere which I always thought sounded tasty. I have tried this once before but it came out particularly flavourless which I knew could not be right, so I have been determined to try it again. This time round I used fresh orange juice and added in orange extract. It came out much much better. So whilst this element was not quite a first, it is the first time I have made it successfully.

Next the candied orange peel. Now I have no idea why I have dodged candied fruit for so long. I am throughly comfortable with caramel and sugar syrups so the dodging must be put down to laziness. Easy ? Well yes really, but certainly time consuming. You need to briefly blanch the fruit in boiling water, and then immediately submerge them in ice cold water so they don’t over cook , and then you cook them in a thin sugar syrup on a low temperature for an hour, flipping them over every 15 minutes. If you want them crispy you then have to throw in granulated sugar and allow to air dry.

And finally the chocolate. Now the beloved is very tolerant of my baking which always seems to start tidily and rapidly descends into chaos, especially when there are many elements to the bake. All I know after this is that if I do a lot of chocolate work in future he is going to go nuts. The chocolate seems to have gone everywhere, especially when I made the collar.
Tempering first. This is all about getting the chocolate to have even crystals in it so it doesn’t look streaky when it dries and has a pleasing snap when it sets. I have read and read about tempering techniques but currently I have no plans to buy a tempering machine at a cool £80, nor a large marble slab, so the only method available to most of us is the “seeding” technique and a decent food thermometer.

The seeding technique involves melting your chocolate until it reaches 50C (and no more!), then throwing in some other finely cut chocolate (the “seeds”) and stir until the temperature drops before working with it. Other than the precision this is not horrendously complex, but what none of the books said was just how long it took to get back down to 28C from 50C, now when you are using 2 chocolates on the collar show on earth you do that and maintain both at 31C. Allow at least 10 minutes for the cooling process and that is 10-15 minutes constantly stirring so you can be doing nothing else, and once it is ready you have to work fast as ideally you need to keep the chocolate at its working temperature off 31C. That means everything else has to be ready!
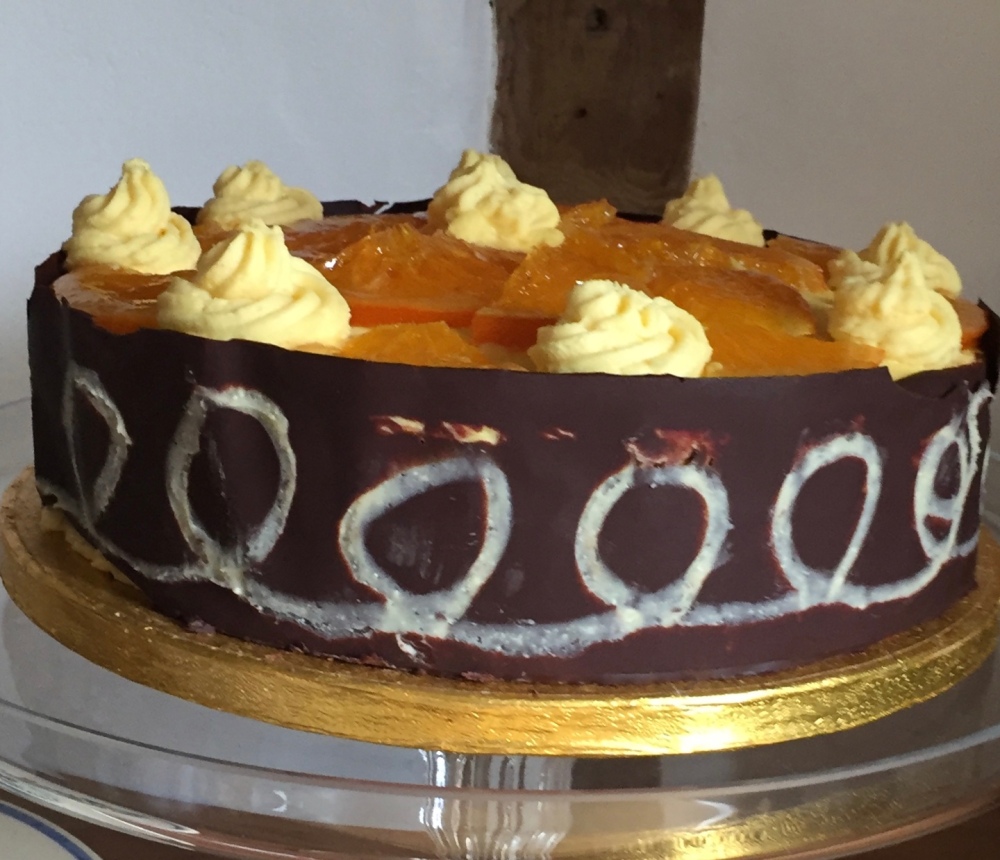
And finally that collar…… hmm . It does not look great. All I can do is beg forbearance as a chocolate collar novice. The idea was for an an informal random pattern in white but my inner Jackson Pollock failed me – next time I am going full splatter or more formal with a stencil or just plain – certainly not this!. But I have learnt a few things. You make the collar by spreading the chocolate on a strip of either baking parchment or acetate, and then wrapping it around the cake. My strips of acetate were too tall for the cake so I went for the parchment technique. Never ever again! The parchment gets floppy under the weight of the melted chocolate and in my case one bit folded under itself (someone is going to enjoy a taste of parchment in their slice), and another bit flopped over the top of the cake. So next time it is acetate all the way and if I am doing a design it will be much much neater!
Will I do this again? It is a tasty cake, but maybe not all elements in one cake as it was a lot of work. The chocolate collar needs practice so it may make an appearance next week when I do that Schwarzwaldtorte, as long as that delivery from Germany arrives in time!
The Recipe
Ingredients
Chocolate Genoise
- 5 medium eggs (room temperature)
- 1tsp orange extract
- 150g caster sugar
- 110g pain flour
- 40g cocoa powder
- 25g unsalted butter (melted)
Orange German Butter Cream
- 500 ml orange juice (use fresh oranges or a good quality juice)
- 2 tsp orange extract
- grated zest from 2 oranges
- 3 egg yolks
- 90g caster sugar
- 45g cornflour
- 100g unsalted butter (for the first stage)
- 220g unsalted butter (for the second stage)
Candied Orange
- 1 large orange washed and finely sliced
- bowl of iced water
- 225 ml water
- 225g caster sugar
Chocolate Collar
- 150g dark chocolate
- 6cm high x 65cm long strip of acetate (or baking parchment)
The Method
Chocolate genoise
- heat oven to 180C / 160C fan
- grease and line an 8″ cake tin
- mix the eggs and sugar together and whisk for about 5 minutes until the mixture forms a ribbon when dropping from the whisk
- sift the chocolate and flour together
- fold into the egg and sugar mix being careful not to knock the air out
- stir in the melted butter and orange extract
- pour into the tin, and create a slight hollow in the centre (this stops you having a dome in the middle)
- bake for 30 minutes until a skewer comes out dry
- allow to cool for 10 minutes
- take out of the tin
- once completely cool, slice into 2 even slices and brush with the orange syrup for the candied oranges


Candied Orange Slices
- slice the oranges thinly
- set up a bowl of iced water
- bring a pan full of water to the boil
- add the orange slices and bring back to the boil for 1 minute
- take out the orange slices immediately and plunge into the cold water
- add the water and sugar ogether in a large pan big enough to take the orange slices in one layer
- bring to the boil without stirring and turn down to a low simmering level
- add the orange slices
- cover and continue to simmer for 1 hour turning the slices every 15 minute
- take out and place on cooling rack to allow any excess mixture to drip off
- then transfer to baking parchment to cool
- set aside the syrup for brushing on the sponges


Orange German Buttercream
- zest and juice the oranges and put the juice in a saucepan
- add the pulp and zest to the juice (this is to add flavour to the juice)
- heat until just boiling
- whisk the egg yolk and sugar together until they lighten in collar
- whisk in the cornflour until smooth
- add a few tablespoons of the hot orange juice and mix to form a smooth liquid
- pour back into the rest of the orange juice in the pan
- bring back to the boil until the mixture starts to plop like volcanic lava
- add the 100g of butter and stir until melted
- press the whole mixture through a sieve taking out the pulp
- add orange extract to taste
- cover with the clingfilm touching the top (to prevent a skin forming) and set aside to cool
- once cool add the rest of the butter and whisk until light and fluffy


Fill and cover the cake
- brush the top of the cake slices with the orange syrup
- fill the cake with half of the buttercream
- reserve about a quarter for piping later
- spread the rest as a thin layer around the side, and then a thicker layer across the top
- put in the fridge for an hour to allow the cream to set


Chocolate Collar
- make sure your acetate is the right height and length for the cake (it should be about 2 cm longer than needed)
- have a medium sized pyrex bowl, and a saucepan big enough for the bowl to sit in without touching the water
- chop 2/3rds of the chocolate finely
- chop 1/3rd of the chocolate coarrsely (halve each square should do it)
- put enough water in the pan so it doesn’t touch the pyrex bowl
- bring to the boil and then reduce to a simmer
- put the finely chopped chocolate in the pyrex bowl and put onto the pan of simmering water
- melt the chocolate until it reaches 50C
- remove immediately from the pan
- add the coarsely chopped chocolate and stir constantly until the chocolate reaches 28C
- all the chocolate should melt before it gets to 28C, but if it doesn’t take out any unmelted chocolate pieces.
- put back over the pan of simmering water and bring back to 31C (again stirring all the time)
- take off immediately
- pour over your acetate strip (put this on some parchment to allow for overflow) and spread to a thin layer
- leave for about 2 minutes to allow the chocolate to start to set
- lift and wrap around your cake
- leave until the chocolate has set (this will be about 5 minutes)
- peel off your acetate carefully and admire
And finally
- decorate the top of the cake with oranges and remaining buttercream

Hi Stephen,
Great looking cake, beautifully decorated.
Could you give me any tips on making a chocolate orange cake with chocolate ganache topping and filling. I tried recently but I’m not convinced it came out OK, my ganache was too runny but maybe that was because the sponge was too hot. I only had a short time to make it and the kitchen was rather busy and the freezer was full!, which in hindsight would have been useful to cool it down.
Any feedback and updates would be great.
Cheers, Ian
LikeLike
It all depends what you want to achieve. Ganache takes at least an hour in the fridge to set which is what you need for a filling, and of course the cakes need to be cool. For the top it depends on whether you want a smooth glaze. For that you can do it straight after making the ganache and pour it over in one smooth pour to get an even finish. Have a look at the Ottolenghi cake https://thecottageloaf.com/2016/07/19/ottolenghis-orange-and-almond-syrup-cake-a-birthday-treat/. It’s messy and it needs a few hours to set afterwards. I have a general rule with baking – never be time pressured or else something will go wrong.
LikeLike
You can send me a message on Facebook/Messenger if you want to talk about that bleeding freezer 🙂
LikeLike
Would love to talk about that bleeding freezer but Im not on Facebook. Are you on Linkedin or have an email ?
LikeLike
You can mail me on stephen@thecottageloaf.com. Fascinated to know if your final cake was a success. Certain mine wasn’t.
LikeLike