Regular readers will know we have had the builders in for the last couple of weeks. Our old shower room needed replacing thanks to Suffolk’s hard water wreaking havoc with the plumbing over the years (and a bit of 1970’s jerry building). The job has been proving trickier than we thought, so we have been staying out of their way. However we got back in the house yesterday evening, as the messy bits are finished and after a few hours of cleaning we have some of our home back. Most importantly, the kitchen was free so I was able to set to with the Bienenstich – the Bee Sting Cake (or as one cookbook rather pedestrianally called it, an Almond Covered Yeast Cake).

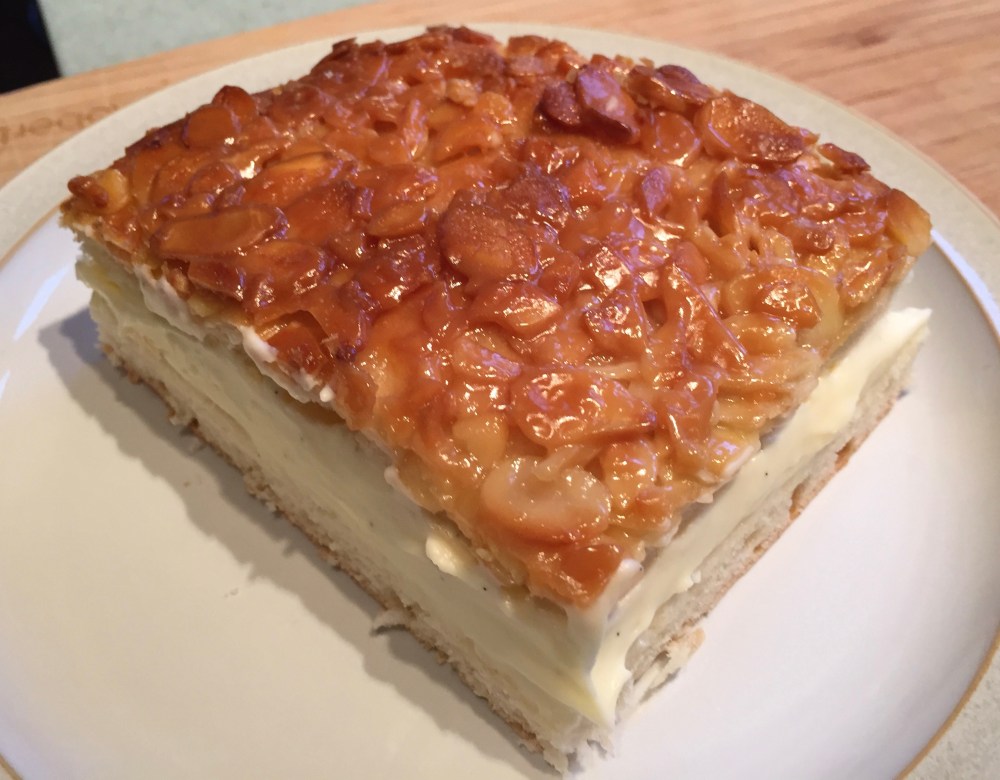
The history of this cake is great fun and you can read it from my post “Difficulty with Bees“. I will concentrate on how to make the cake for my post today. It is called Bienenstich (Bee sting) because the almond topping is reminiscent of bees in a hive. This cake is huge in Germany and frankly I can see why. It consists of a brioche covered in a crunchy almond topping, sandwiching a layer of Creme Diplomate. It is a cross between a custard slice and custard filled donut, and the crunchy topping is most toothsome and actually takes the cake to a tasty treat from what otherwise would simply be a custard sandwich.
There are a few basic baking skills you need for the constituent parts of this bake, but it is the assembly that is tricky and it took me a few goes to work out what to do (fortunately the cake is huge so there was plenty to practice on) The assembly trickiness divides into the cutting of the cake ready for filling, the firmness of the filling, and the neatness of it all for serving. In an ideal world a mousse ring (or square) is best to hold all this together while the custard filling sets or else you get a squidgy mess on your hands when you put the top on and you won’t have a beautiful thick layer of custard in the middle. If you don’t have a mousse ring then I would use the baking pan and reline it with tin foil and reassemble the whole cake in the pan. I had to get inventive with tin foil which worked out, though I made sure the filling was semi set before starting to assemble.
For the filling, I have gone for quite a firm set here but if you don’t like that then drop the gelatine, but beware of the squidge if you do which you can see in the picture below!

The other tips are around the slicing of the cake before assembly. You need to pre cut the top into portion sizes so that when you serve the cake it doesn’t splurge the filling out. It is also really easy to get in a muddle once you have cut the portions. You need to keep them in order but if you spin the board to cut, you can quickly forget which side lines up with the bottom half. I always put a tooth pick in the top and bottom slice so that I know how to put the 2 halves back together – a tip for any cake that needs slicing by the way.

Lastly there are some variations on the filling. The Creme Diplomate with a gelatine boost is the most common, but some just use Chantilly cream with gelatine, some just a custard with a firm set, and others use German Buttercream. Vanilla is pretty ubiquitous in most German baking and so it is here.
I would definitely recommend this cake. It is not complex once you have cracked the filling issues and absolutely delicious with a cup of tea or coffee.
The Recipe
Ingredients

For the Brioche
- 500g Plain Flour
- 100g Caster Sugar
- 7g Dried Yeast (1 sachet)
- 250g Lukewarm (this is important) Full Milk
- 50g Butter
- 1 1/2 tsp Vanilla Extract
- Pinch of Salt
For the Creme Diplomate
- 750ml Full Milk
- 1 Vanilla Pod
- 6 medium egg yolks
- 135g caster Sugar
- 60g Cornflour
- 18g Gelatine (sheets are best)
- 450ml Double Cream (kept cold)
For the Nut Topping
- 100g Double Cream
- 2 Tbs Honey
- 50g Butter
- 100g Sugar
- 200g Flaked Almonds
The Method
Preparation
- grease a baking pan with butter
- have some toothpicks ready
- soak the gelatine sheets in cold water (if you use granules, then just before you need to add the gelatine to the Creme Patissiere add some water, put in the microwave and heat until dissolved)
- pre heat the oven to 200C / 180C Fan
- make sure there is space in your fridge for your baking tin
The 9 stages
- make the brioche dough
- while it is proving make
- the creme patissiere
- the nut topping
- roll out the dough and cover in the nut topping
- prove for another 15 minutes
- bake for 20 minutes and allow to cool
- whip cream and combine with the creme pat
- slice the brioche and fill
Brioche Part 1
- ideally you need a dough hook attachment so you can knead the brioche with your mixer – kneading brioche by hand is a messy business
- combine all the ingredients until a thick paste
- knead until silky and the dough forms a ball
- cover with cling film
- place somewhere warm and allow to rise for 30 minutes …. meanwhile


Creme Diplomate – Creme Patissiere stage
- separate the eggs and set to one side
- split the vanilla pod and scrape the seeds into the milk
- put the pod into the milk and bring the milk to the boil
- set aside to cool for 5 minutes
- add the sugar and cornflour to the egg yolks and hand whisk until lightening in colour
- add a small amount of milk to the egg mixture and whisk in and repeat
- pour the egg mixture back into the milk and bring back to the boil for 2 minutes whisking all the time to stop lumps forming. The mixture will be gloopy and burp rather than boil.
- take off the heat and press through a sieve
- squeeze the water out of the gelatine sheets and whisk into the mixture cover with clingfilm (touching the surface to prevent a skin forming)
- put in fridge to cool


Nut Topping
- put the cream, butter, honey and sugar in a pan and bring to the boil
- take off the heat immediately and stir in the flaked almonds
- set aside to cool, stirring from time to time


Brioche Part 2
- the brioche should have risen appreciably (at least doubled in size) by the time you finish the creme pat and nut topping but if it is chilly in your kitchen you may have to wait
- take out of the bowl and give a quick shape
- allow to rest for 5 minutes (this allows the dough to relax making the next stage easier)
- roll out the rough size of your baking pan
- place on baking sheet and tease the dough to the edges using your finger tips
- put dollops of the nut topping on the dough
- spread to the edge using a palette knife (the more dollops, the easier this is)
- allow to rise for another 15 minutes
- bake in the oven fro 20 minutes until the topping begins to brown (this happens in the last 5 minutes so keep an eye on it)
- cool on a cake rack in the tin.


Creme Diplomate Part 2
- The Creme Patissiere made in Part 1 should have cooled to at least room temperature
- Quickly whisk the Creme Pat by hand to break it up
- Whip the cream until stiff
- Fold in one third of the cream into the creme pat
- Fold in the rest until combined and smooth (give a quick hand whisk to smooth out any cream lumps)
- return to the fridge and allow to become semi firm


Slicing the Brioche into 2
- take the cake out of the tin and place on a board
- wash your tin and reline covering the sides and bottom with foil (this isn’t what I did put you can get the idea from the pictures)
- lift your loaf out of your tin
- trim off the edges
- cut the loaf into 2 (this makes it easier to slice) and set one aside
- slice the remaining half into 2 slices so you have a top slice with nuts on it
- before lifting off the top slice put a toothpick into the top and bottom halves in the same place
- now cut the nut topped half into 6 portions and set aside leaving in the exact order they were when you cut them
- place the bottom half back into the foil lined tin (keeping the toothpick stuck in the side that matches the top half toothpick)
- repeat for the other half of the loaf


Assembling the Cake
- make sure there is a supporting edge all around the cake (use the foil to create a wall if necessary)
- spread the Creme Diplomate over the bottom half
- place your nutty portions on top keeping to the order they were before being cut into portions
- put the whole tray in the fridge and allow to set


And to serve
Make coffee, slice, place on plate and make a squidgy mess over your fingers which will only make eating it nicer.

I’m so impressed with each of your posts — you so thoroughly describe every step and it’s so very entertaining. I’m currently sitting at work and my tummy is rumbling and I believe this Bienenstich is the only thing that could make it stop. I WANT IT NOW! haha
LikeLike
Thank you so much – and it is very delicious indeed so please try it. I hope the lack of Cups in the recipe is Ok for you.
LikeLiked by 1 person
It’ll be a little tough but I’ll figure it out. I’ve been needing to get a good scale for a while now
LikeLike
They are a marvellous new invention you know 🙂
LikeLiked by 1 person
Haha. They will be in my kitchen! 😉
LikeLike
I even weigh my liquids ….. so I think I am at the other extreme from your cups.
LikeLiked by 1 person
Some argue that that’s the best way to do it for baking. I don’t doubt that one bit. Precision is absolutely necessary and scales are waaaay more precise than cups.
LikeLike