I can officially say I am now baked out for Easter. My finale was going to be a Polish Babka Wielkanocna, a rich bundt cake (12 egg yolks are just the start of its richness) that caught my eye on Mary Berry’s programme and in the papers, but after making this monster loaf it will have to wait (though maybe not too long as the husband and I have a big day coming up soon – more on that one later). There is always Orthodox easter coming up soon , so some dishes may sill get done, but most will now have to wait until next year.

Instead for my finale I have done this traditional German Osterkranz, or Easter Wreath to non German speakers. It has lots of baking twists (well mainly the plaiting), plus I have never done coloured eggs before and lastly I thought it would just look nice for when our neighbours, Nigel and Wendy, came round to dinner. Unfortunately after the fun wth the Easter Bunnies I got a little overambitious. Normally this is a 2 plaited or maximum 3 plaited bread. Mr Over Confident here thought he would go for a 5 plaited loaf which looked particularly fiendish and fun. That one decision ed to an avalanche of problems.

Firstly I broke the most rigid rule of baking which is when trying something new DON’T wing it! JUST DON’T! I wanted to see what a non sweetened enriched loaf was like because enough sugar has been imbibed this week to make a sugar loaf mountain, but that meant adapting various recipes. Added to that I wasn’t sure whether to increase the quantities to allow for the greater number of plaits, so I made an executive decision and decided to up the quantities by 50% and replace the sugar with flour, and the butter with some left over quark in the fridge.
So far so bad. But my traumas were not yet over, not even beginning to be over. I reached into the flour cupboard (yes the beloved has generously assigned me one cupboard just for flour), pulled out the bag of white flour I bought that afternoon , opened it up and just before tipping it in the mixing bowl thought it looked very bitty for white flour, which was for one very simple reason. It wasn’t white flour! It was wholemeal! We were obviously more tired than we thought when we shopped that afternoon.

This now meant I did not have enough white flour to do what I wanted. Normally that would mean popping into the car and grabbing a bag at the local supermarket, but because I had decided to do an overnight fridge prove, this was all happening at 10 pm and I can guarantee the local garage, which is the only shop open at this time of night, does not do bread flour. Normal baking flour was all that was at hand, along with a tiny amount of white four, and the problem with normal flour is it produces less gluten. You can produce an OK’ish ordinary loaf with baking flour, but I needed a stiff strong flour for plaiting, so I knew this was not ideal.

So so far, I was winging the recipe, taking on a method I haven’t really done much before, and now not using the right ingredients. So what heinous baking crime should I commit next? Well in for a penny, in for a pound, I ploughed on and started to throw the ingredients together, whipped on the stand mixer and started the knead. The dough being mixed was very very wet, more like classic brioche dough than the stiff dough I wanted. It is now 10:30pm and I am scratching my head and trying to work out what was wrong. The baking flour ? The Quark? No neither of those. When I increased the quantities I had got my maths wrong and added 2 too many eggs which amounts to 120g of liquid. To make up for that if I wanted to get the right consistency I would need another 200g of flour, the very flour I already didn’t have enough of. There was just enough in various bits at the back of the cupboard, however now I didn’t have a mere 50% more than the normal quantities, I had nearly double! This was going to be a huge loaf.

With the dough now made, it was flung into the fridge and I headed to bed with the whys and wherefores of the mistakes spinning in my head, which never bodes well for a good night’s sleep. The next morning I got up less than refreshed and set to. A little sobered by the night before, I decided to step back a bit and only do a 4 plaited loaf. To be honest this part went a little better but yet more mistakes were made, though this time from inexperience with this type of wreath rather than daftness. So here are a few serious baking tips for you to think about.

Plaiting
Rolling out the plaits takes time and patience to get them even, especially when each one is 80 cm long. The key is keeping your work surface and dough clean of any flour so the dough sticks slightly and rolls. You should use downward and outward pressure as you roll, keeping a beady eye for areas getting too thin and avoiding working those areas. I have added a few pictures to show you what I mean.


Once the plaits are finished, lightly flour each one as this will stop them merging into each other and make them easier to work with. If you need to do a quick adjusting roll then you can counteract the slippiness of the flour by dampening your hands.
The plaiting itself is fun, and intriguing as you watch the pattern emerge, but again requires a little focus. With plaits this long you also need to be very careful at the start to get a relatively tight plait without stretching the dough.


I also had some left over so used these to do a second small wreath using a 3 plaited dough which was much more straightforward (basically you alternate taking the left plait over the centre one, and then the right one) and produces a nice pattern.


I have reproduced detailed instructions the plaits from Jeffrey Hamelman’s superb, though somewhat technical book, Bread.


Forming the Wreath
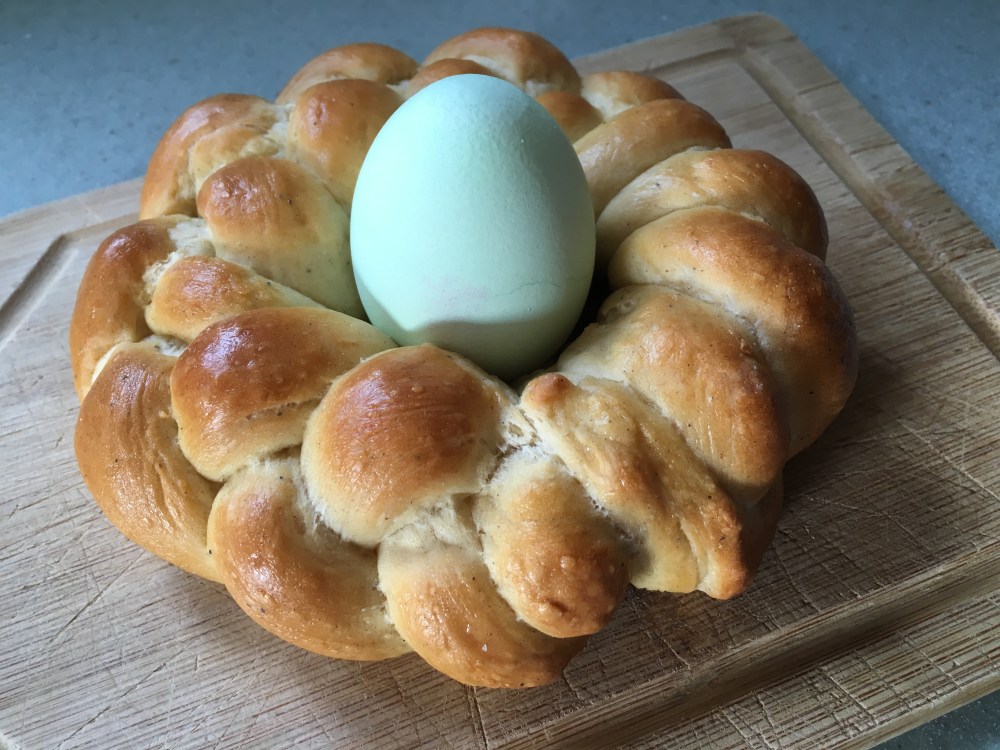
Normally with a plaiting bread you just tuck the ends underneath to create a neat finish. With a wreath you can’t do that. You need to do as good a job as possible at making the join look like the rest of the plait or add a decorative feature (in this instance an egg) to cover up the join. Other than that it is quite simple to form the wreath, as the plaited dough is quite strong but watch out for stretching it.
If you want to guarantee keeping the middle open then insert an object into the middle. The upside of this is you get a clean wreath shape because the hole doesn’t close during the rise and the bake. The downside is that you lose the plait pattern and glaze for the inside rim. Also make sure you wrap any object in foil to prevent it sticking to the dough – that was my next mistake I won’t be repeating as I fiddled to extract the object at the end of the bake.


Making the Eggs
Colouring the eggs is a relatively simple matter, and can be done well in advance. Remember though these are still eggs and need keeping in the fridge once done. Ideally you need white eggs which are harder to find in the UK, and you will also need to put up with the date stamp which all shop bought eggs have.


All you need to do is add food colouring to water and boil the egg for 10 minutes. To get even pale colours you need to add a lot of colouring to the water. I also found there was a difference between different egg boxes with one set colouring up much better than the other. I suspect older eggs colour up better but frankly that is a guess. And yes, you can still eat the eggs. The colour does not get through the shell.
So the eggs can sit on the top of the wreath, you need to make cups for them to sit in. The best way is to use old egg shells wrapped in tin foil, which you then press deep into the wreath. I mean deep! I didn’t do them deep enough (next mistake) and the eggs were only just able to balance on the top – that isn’t really the look you are trying to achieve. If need be use some flour to prise apart some strands of the plait to get the egg shell in. I would also suggest filling the egg shell with a bit of foil as well to give them some extra strength, which again I was unable to do because alongside the many other mistakes, we had also run out of foil.


Egg Washing
To create a smooth surface I would recommend egg washing at the start of the first prove which will keep the top moist, and again just before going into the oven
Proving
Prove in a plastic bag and prove for a little less time than normal. An increase of 85% is what is needed so watch out for the rise and don’t let it get away from you.
The Actual Recipe?
Well I daren’t reproduce one as frankly I made it up, but here is what I would try next time, but please don’t hold me to it as I have no idea whether it will be OK!
- 555 g white bread flour
- 7g (1 sachet) dried yeast
- 50 g quark or yoghurt
- 7 g salt
- 2 tsp ground cardamom
- 1 egg
- 210 g cold full fat milk
- 1 additional egg for brushing
Last but Not Least
Despite the catalogue of errors, what emerged was still something that I didn’t mind presenting to Nigel and Wendy, who oohed appreciably over it and took half away with them for their breakfast. The lesson from all of this? If a bread bake starts going wrong, persevere with trying to fix the problem as bread is a little more forgiving to errors and see what comes out the other end. You just never know.
With this bake, I finally say farewell to Easter for the time being and will set my mind to the next baking challenge . If you have some ideas do please feel free to make a suggestion.

Good heavens. Hadn’t realised quite how much work and angst went in to your delicious loaf. It tasted as good as it looked and your complicated alternative recipe worked in the end. It also made good toast as we suspected ( a large hunk was generously shared after our delicious dinner cooked by the other talented person in the kitchen, yes there are 2 in this Suffolk home ! ) . Obviously a talented baker to make a silk purse from a sows ear !! If a recipe for the olive bread is posted I can thoroughly recommend this as well x
LikeLike