My brother and his french wife are staying along with their 2 lovely girls so the stops had to be pulled out and we decided a quick trip to the cuisine of France was needed. The hubby made a Beef Daube and Aligot Pototoes, and I decided to try these little Opera Cakes.
The Opera Cake has become a French classic, but it is only invented in 1955 by pastry chef Cyriaque Pavillon who worked at the legendary Dalloyau shop in Paris. The shop started life supplying complex sweet treats to Versailles (oh how the French love to glory in Louis XIV – for me he sounded like a dictatorial pompous ass ….sorry). The cake of course is a Johhny Halliday come lately to the Dalloyau repertoire. Supposedly Cyriaque’s wife told him the cake looked like the interior of the Paris Opera House, the Palais Garnier, and the name has now stuck.


That wasn’t the original plan. I was determined upon that much maligned German classic, the Black Forest Gateau or Schwarzwaldkirschtorte (which sounds much more exciting). But on Monday the Bake Off Creme de la Creme Book arrived and these little treasures featured in it and given the ingedients were similar to the Black Forest Gateau I couldn’t resist.
If you haven’t been watching Bake off Creme de la Creme , it involves a baking competition between professional teams of Patissieres. I didn’t warm to it at first thinking their creations were too complicated for the home baker, but over time I have realised there is tons that you can pick up (Ok – colour gun and a chocolate swan might not be on the cards for a while). The programme also has the best but most frightening judge on TV in the form of Cherish Finden. Woe betide the contestant that delivers a slice that is a mere millimetre different from the last. She has developed quite a fan base – and with justification.
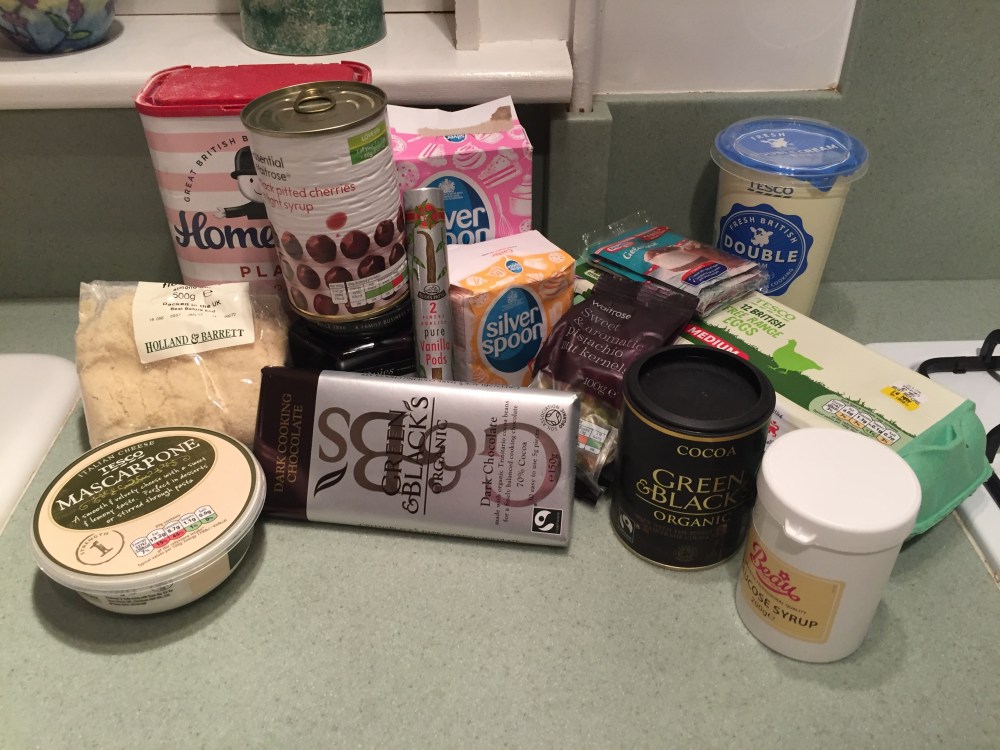
There are some fabulous recipes in the book, but I chose these little slices from it because the use of Kirsch Cherries and was at least some sort of a nod to my original intention. It really should have been Griotines cherries but these proved very hard to source in the time available, though I am certain would have elevated this cake to another level had I used them.
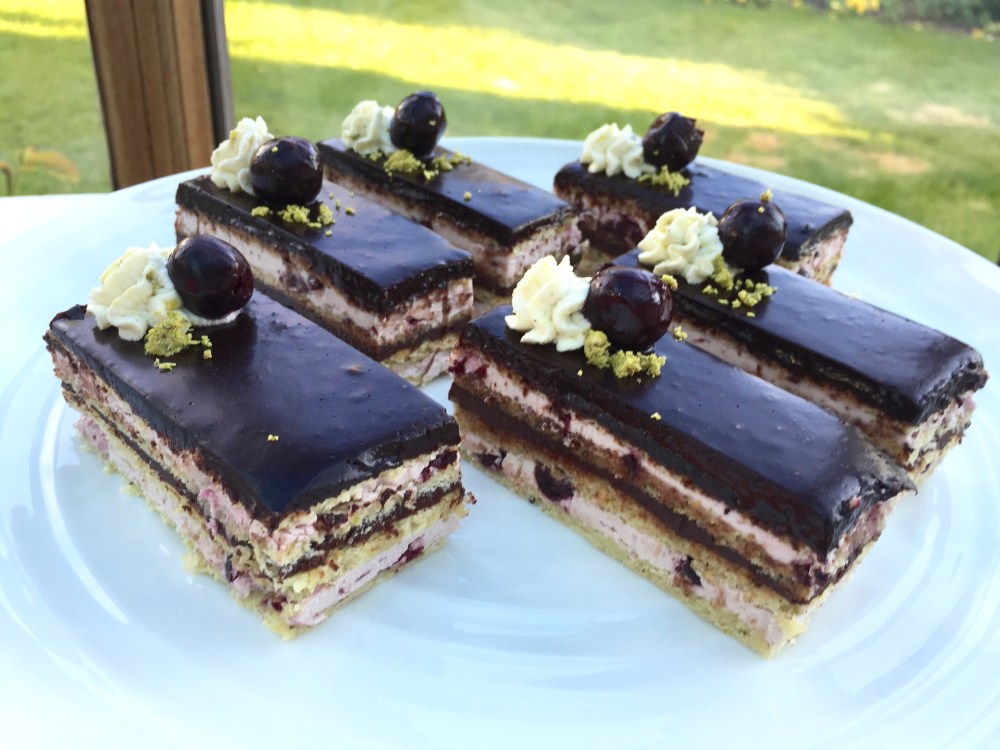
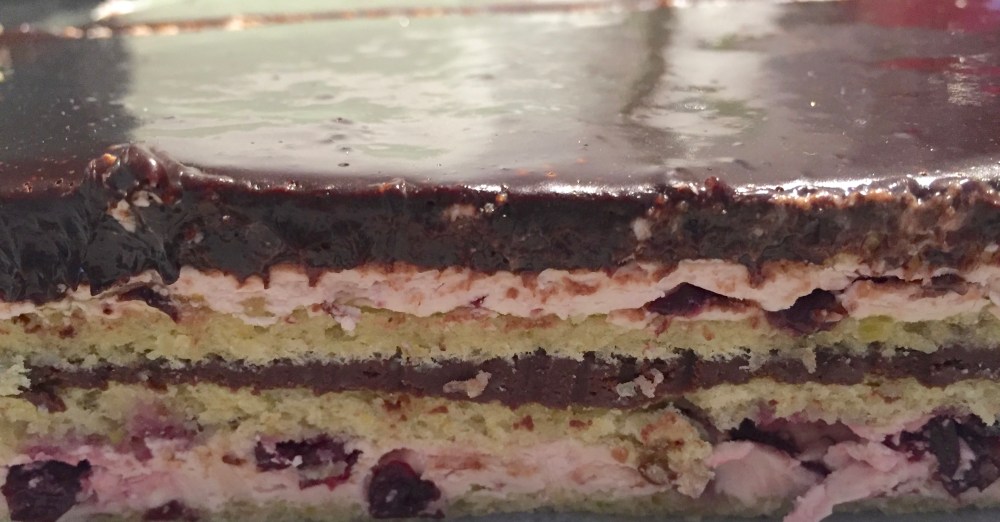
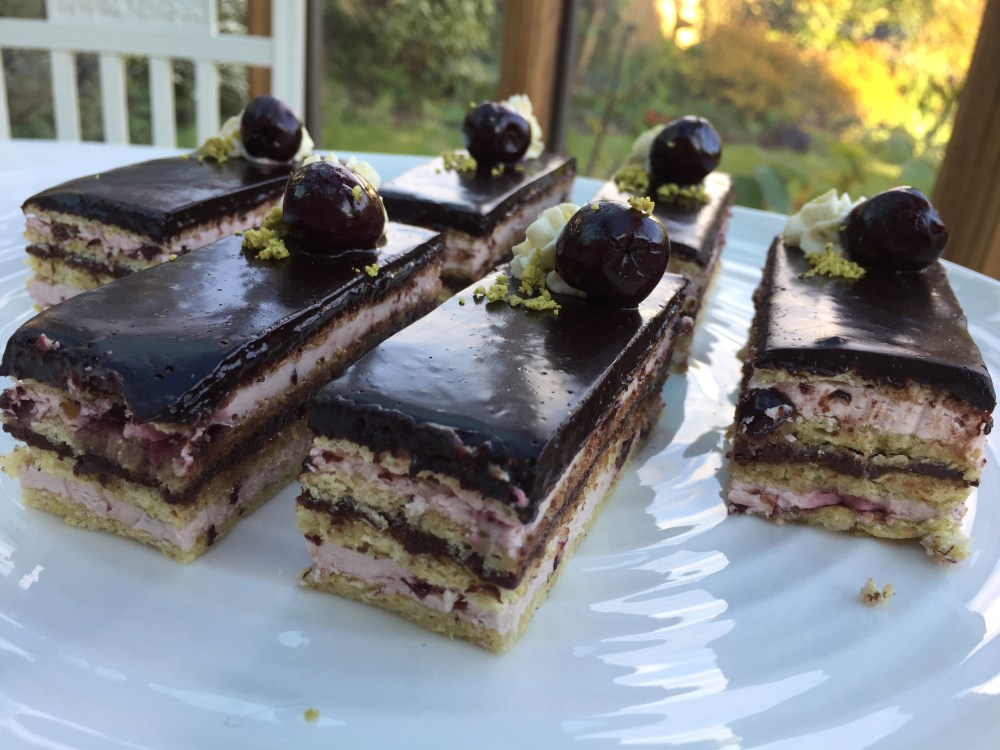
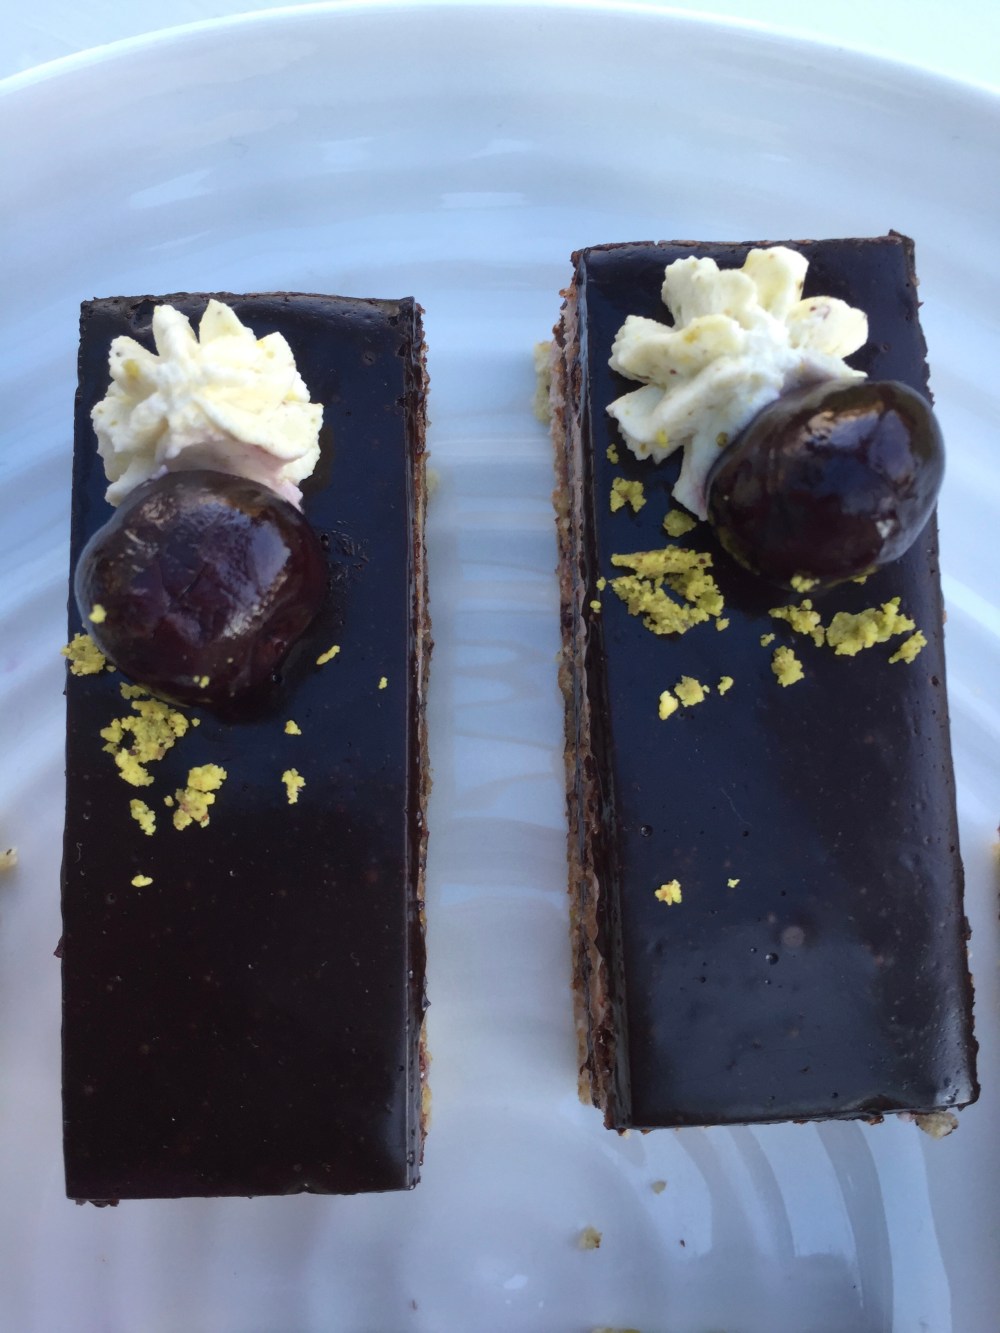
It is 4 sumptuous layers of pistachio jaconde sponge (a nut based genoise sponge with barely any flour), with kirsch cherry french buttercream, chocolate ganache and a mirror chocolate glaze on the top. It is a very rich cake and the Chocolate Glaze is über chocolate flavoured. We served it as pudding with a lovely sweet Muscat which cuts through and complements the richness of this little delight, but I promise you one slice satisfies. As I said before it is very rich.
Much is made in the Bake Off Creme de la Creme of precision being the core of the professional Patissiere and that means time is needed. The recipes are very very precise including weighing the egg constituents, so any Amercians reading this (you know who you are!) get a set of scales and use those cups to drink from, not measure things. The quantities also do not leave much room for error, especially with the sponges (more of which later). There were also a few things I would not agree with so I have altered the method and technique slightly to allow for this.
The biggest issue was the time. The book says 1 hr 45 minutes. Well maybe if you are a professional chef with a battery of sous chefs at your beck and call, but in reality 3-4 hours is more like it. Unfamiliarity with the recipe, and all that photographing always slows you down, but I reckon it would never be less than 3 hours end to end to get it assembled, and then the cake needs to be chilled, and then sliced and decorated (which takes another 30 minutes if you want to get some precision).
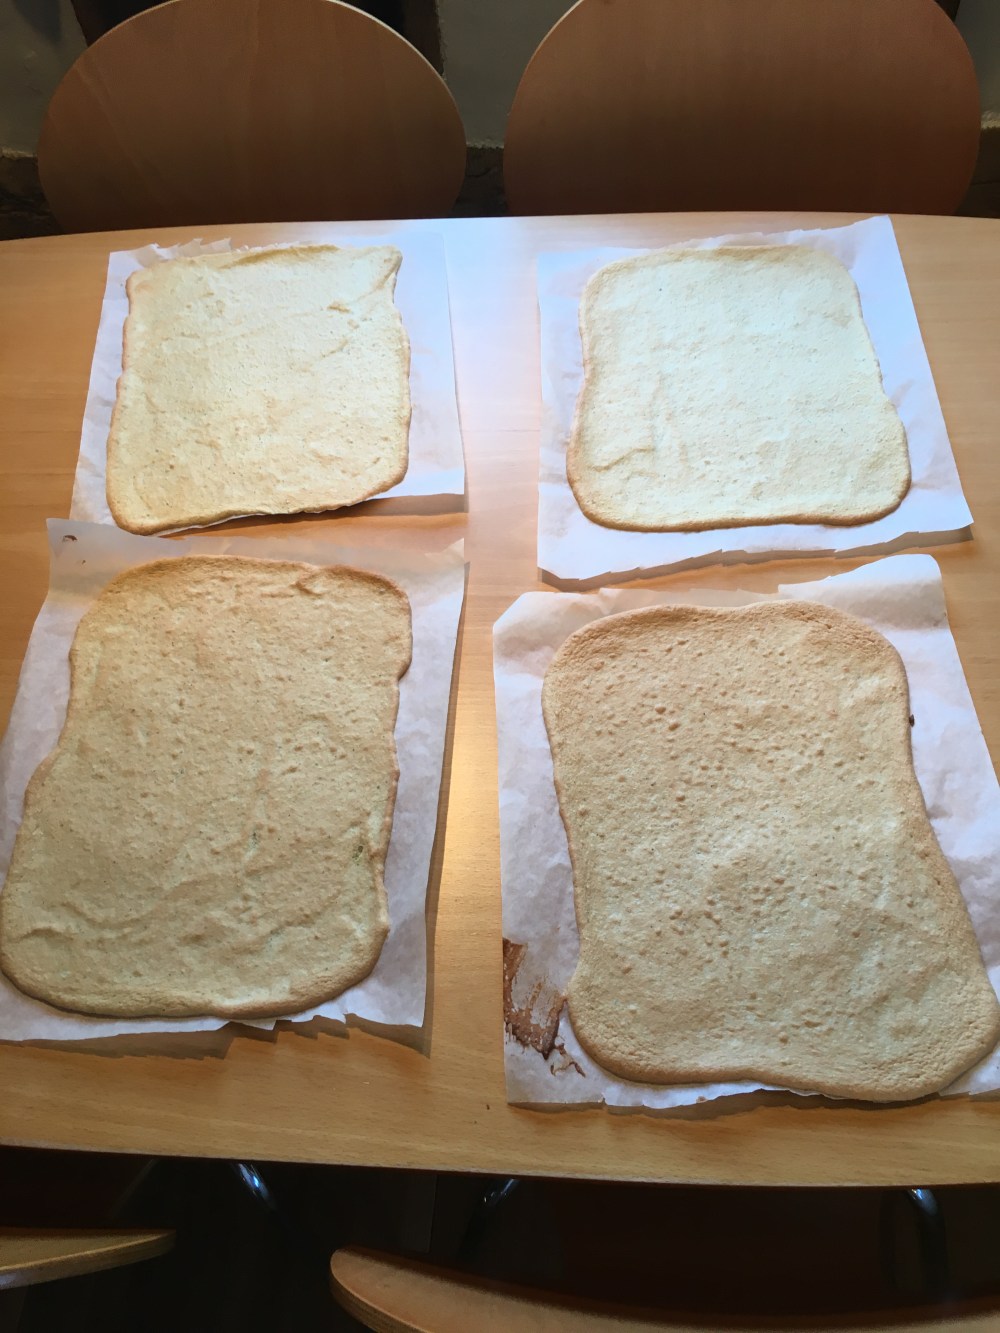
So where were the tight corners? Well the book suggested making the sponge layers in advance the night before which seemed like a sensible choice as big bro was due to arrive at 12 the next day and I also had a quiche to make (yes I can do savoury as well).
It also recommends making the 4 layers in 2 goes out of 2 big sheets and then cutting them out into the 4 layers. Well I discovered a number of downsides to this approach.
- Firstly my baking sheet is only just wide enough at 40 cm to make a big enough slice for the mousse mould twice over, and when it came to cutting out I found that I hadn’t spread the mixture to the farthest extremities of the baking pan which meant one of the sponges was a little short and I would need to patch (though there was little left to patch with as the hubby had been given the shavings already).
- The second is baking parchment. You make the sponge layers by manually spreading out the batter over the parchment. This is exactly the same technique I used when making The Prince Regent Cake and I came across the same problem there. The wetness of the batter makes the paper crinkle and because the layers are so thin this is a problem especially if you want consistent layers in every slice because you get ridges in your sponge. This is exacerbated by the size of the sheets the recipe suggests you bake. By the time you have got the batter as smooth and even as possible, the paper is very damp. I now know why professional bakers use Silpat sheets whose acquisition I will may be negotiating with the beloved.


Foolishly I then innovated. With the Prince Regent cake the layers are stacked and weighted to force a consistent thickness and I thought to also sort out the ridge problem. That is what I promptly did though maybe I went a little too far. The result was I squashed the life out of the layers with really isn’t what I wanted.
The other half told me to live with it and put it down to experience. That’s not for me I am afraid, so I was awake at 6:30 the next morning and set to all over again, this time increasing the batter mixture by 1/3rd, doing the layers one at a time, and marking out the mould shape on the back of the paper to ensure every piece was big enough. This has the advantage with the greater amount of batter, of ensuring that every layer is big enough and reduces the ridging effect because the batter spends less time on the paper before being whipped into the oven. Frankly this took just as much time as the recommended method and is more foolproof.
The old squashed sponges have not gone to waste though. They are now in the freezer and may be making a reappearance soon in a version of the Prince Regent cake I am thinking up along the lines of arrange german butter cream and a mirror glaze. It may take a few months to make an appearance but watch this space.
The baking part of this is not that complex. The jaconde sponge is an easier version of Genoise, French Butter Cream is very like Italian meringue, the Ganache is simple if you keep the temperatures right, as is the mirror glaze. What makes this tricky is the shere number of processes (all 14 with lots of sub processes within each) and the need to aim for a perfect finish.
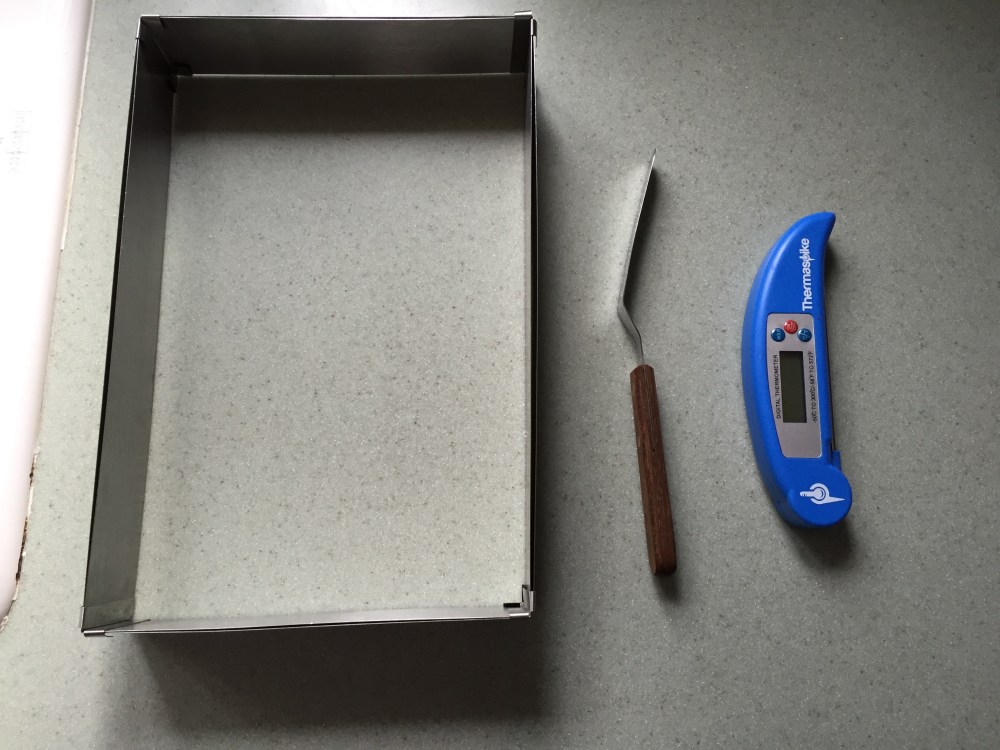
You do however need a few pieces of kit in order to do this cake. Without the mould you cannot build the cake, though you could use the sides of square springform baking tin (though reduce the quantities if you do). An inverse palette knife should be in every baker’s batterie de cuisine – it makes all the spreading in this recipe so much easier. Lastly without the thermometer you can’t do the French Buttercream or glaze.
So in conclusion was it all worth the huge amount of effort? Well when served after a delicious dinner, they received much praise. They are however very very chocolatey and very rich. If you like that on a cake then this is the one for you. I am not so sure and the beloved definitely prefers citrus flavours in his puddings so I didn’t get a very fulsome “Oooh” this time. Next time I would definitely cut back on the Cocoa on the glaze, and definitely make the effort to find Griottines as they have a much stronger flavour.
The Recipe (adapted slightly from the Bake Off Creme de la Creme cookbook)
Essential Equipment
- An 18cm by 28cm rectangular mould
- Baking parchment
- Sugar thermometer
- Inverse spatula
- Star shaped piping tube
The Ingredients
Pistachio Paste
- 100g pistachios ground very fine to paste
Pistachio Syrup
- 95g caster sugar
- 65g water
- 15g pistachio paste
Pistachio Jaconde Sponge
- 180g caster sugar (split 105g for the batter and 75g for the meringue stage)
- 160g ground almonds
- 40g plain flour
- 65g pistachio paste
- 205g whole egg (about 4 medium eggs)
- 140g egg white (about 5 eggs – you will use some of the yolk later)
- 30g butter (melted)
Cherry Butter Cream
- 150g caster sugar
- 15g liquid glucose (replace with honey if you don’t have this)
- 35g water
- 35g whole egg – just under 1 medium
- 35g egg yolk (about 2 medium from the 4 you set aside when making the sponge)
- 200g butter, softened and cubed
- 25g fresh cherries (tinned if you don’t have these but please try to get fresh)
- 100g cherries in kirsch – preferably Griottines
- 7g kirsch (from the jar of kirsch cherries)
Chocolate ganache
- 125g double cream
- 20g glucose or honey
- 125g dark chocolate (68% cocoa solids)
Dark Chocolate Glaze
- 2g powdered gelatine
- 65g water
- 105g caster sugar
- 35g cocoa powder
- 33g double cream
- 25g dark chocolate (finely chopped)
Pistachio Chantilly
- 20g mascarpone (this is a tiny amount so plan another bake around what is left)
- 7g icing sugar
- 100g double cream
- 1/4 vanilla pod seeds
- 10g pistachio paste
To decorate
- 14 good looking kirsch cherries
- 15g finely chopped pistachio (though I ended up using what was left of the paste)
Just to help you with the shopping list
A number of ingredients come up a few times so here is the total of what you need for all the various components
- Caster sugar – 530g
- Pistachios – 115g
- Eggs – 10 medium
- Double cream – 225g (or ml)
- Butter – 230g
- Dark chocolate – 125g
- Kirsch cherries – 2 jars depending on fruit weight in jars
The Stages
- Cut out 4 baking parchment sheets with the mould shape outlined on the paper
- Make the pistachio paste
- Make pistachio syrup
- Bake the jaconde sponges
- Cut the jaconde sponges to size
- Make the cherry butter cream
- Assembly Part 1 – Jaconde, Syrup, Butter Cream, Jaconde, Syrup – then chill
- Make the Ganache
- Assembly Part 2 – Ganache, Jaconde, Syrup, Buttercream, Jaconde, Syrup – then chill
- Make the chocolate glaze and pour over top of cake
- Chill for a few hours
- Make the chanttily cream
- Cut into 14 even slices
- Decorate the slices with piped chantilly cream and a kirsch cherry
The Layers
From bottom to top in order of assembly
- Jaconde sponge
- Pistachio Syrup
- Cherry Buttercream
- Jaconde sponge
- Pistachio Syrup
- Ganache
- Jaconde sponge
- Pistachio Syrup
- Cherry Butter Cream
- Jaconde sponge
- Pistachio syrup
- Chocolate Glaze


To make the Pistachio Paste
- finely chop the pistachios (or grind in a spice mill if you have one)
- grind to a fine paste in a pestle and mortar


To make the Pistachio Syrup
- put the water, sugar, and pistachio paste into a pan
- boil for 1 to 2 minutes
- set aside to cool
To make the Jaconde Sponge Layers
- Prep
- heat oven to 200C / 180C Fan
- cut out 6 pieces of baking sheet bigger than the cake mould
- mark 4 sheets with the outside rim of the mould and set aside
- weigh the bowl you will be finally combining all the ingredients into
- Jaconde Part 1
- combine the dry ingredients into a bowl (ground almonds, pistachio paste, flour, 105g sugar)
- add the whole egg
- beat the mixture to a smooth batter
- add the melted butter and mix in
- Jaconde Part 2
- put the egg white in a clean dry bowl
- whisk the egg whites to stiff peaks
- add the sugar 1 spoon at time while whisking
- beat until you have a stiff glossy meringue
- Jaconde Part 3
- put 1/4 of the egg into the nut batter and mix in
- fold in the remainder of the meringue being careful to not lose the air but making sure no egg white is showing ( I now have a very slow beat option for folding on my stand mixer – check to see if you do as well as it minimises the mixing)


- Jaconde Part 4
- weigh your batter mixture (if you weighed the bowl beforehand you can do this without taking it out of the mixing bowl)
- lay a piece of parchment paper marked side down on a baking sheet
- evenly spread 1/4 of the mixture onto the sheet taking care to ensure you have gone 1 cm over the edge of the marking
- bake in the oven for 8 to 10 minutes until slightly browning in the edge
- take out and cool
- repeat for the next 3
- TIP: you don’t need to worry about opening the oven mid bake so just get the production line going until you have 4 of them


- Jaconde Part 5
- flip a piece of jaconde over onto a clean piece of baking parchment
- carefully peel away the parchment
- place the mould on top
- mark the sponge with a sharp knife tracing out the inside edge
- carefully cut away the excess (I always use a serrated knife when cutting fine sponge)
- set aside and repeat for the other 4
- cover to keep dry


Make the Cherry Butter Cream
- you need your thermometer for this one
- puree the fresh cherries (if using tinned cherries you need to use a lot more cherries to get puree rather than juice)
- roughly chop the kirsch cherries
- put all the egg in a clean dry mixer bowl (make it deep – you are pouring boiling hot sugar into this while whisking it btw)
- put the water, sugar, glucose into a pan
- bring to the boil
- when the temperature hits 115C start whisking the egg
- when the temperature hits 121C pour the boiling stage mixture slowly onto the egg mixture while it is still whisking
- carry on whisking until the mixture becomes thick forming distinctive ribbons when you lift the whisk out
- slowly add the butter while it is whisking until you have a thick butter cream
- whisk in the the kirsch and cherry puree
- fold in the chopped kirsch cherries
- set aside to cool


Assembly Part 1
- lay a piece of clean baking parchment on a baking tray
- place the mould in the middle
- carefully put a piece of jaconde in
- brush with pistachio syrup
- add half of the buttercream and smooth to an even surface right to the edge
- cover with a second piece of jaconde
- brush with syrup
- place in fridge to cool


To make the Chocolate Ganache
- place your finely chopped chocolate in a boil
- put the cream and glucose/honey in a pan
- heat until almost boiled
- pour the hot cream onto the chocolate using a hand whisking as you pour
- WARNING: If the cream is too hot the mixture will split – this can be rescued by whisking in a small amount of milk


Assembly Part 2
- take your cake out of the fridge
- spread the ganache until you have a smooth and even finish right the edge
- put another piece of jaconde on top
- brush with syrup
- add the rest of the buttercream
- put the last piece of jaconde on top
- brush with syrup
- put back in the fridge


To make the Chocolate Glaze
- in a small bowl put the gelatine and 10g of the water to soften the gelatine
- put the finely chopped chocolate in a bowl
- put the remaining water, sugar, cream and cocoa in a pan and bring almost to the boil
- quickly stir in the gelatine until dissolved
- pour the liquid onto the centre of the chocolate stirrng all the time until you have a smooth glossy mixture
- allow to cool to 44C
Final Assembly
- pour your glaze over the top to create as even a covering as possible
- tip and tilt the cake to cover right up to the edges
- finish off with a palette knife (use this as little as possible if you can)
- tap the whole mixture sharply on the work surface to even off the spread
- put the cake back in the fridge for at least 2 hours covering to protect the glaze from being spoilt

To make the Pistachio Chantilly Cream
- combine the mascarpone, vanilla seeds and icing sugar together into a smooth paste
- add the cream and whisk until stiff enough to pipe
- stir in the pistachio paste
- add to a piping bag and seal and set aside


To cut and decorate the slices
- using a warm palette knife release the cake from the edge of the mould carefully cleaning the palette knife after each use
- trim the edges of the cake to get a clean edge (again keeping you knife scrupulously clean and warm)
- slice the cake lengthways
- slice each half into 7 pieces (aways cleaning your knife after each cut)
- decorate each slice at the end with a star of cream
- place a cherry next to the cream
- sprinkle the slices lightly with pistachio
- carefully lift onto a serving plate with a palette knife
- serve and enjoy!


I love watching the Bake-Off, too, but I would never have attempted Opera Cake at home. You’ve done a marvellous job!
LikeLike
Thank you so much . To a certain extent the individual parts are not too tricky. It is just the huge number of stages that makes this much more difficult than I thought it would be.
LikeLiked by 1 person