I have definitely gone slightly entremet mad since Christmas, and whilst I am also trying to be good and avoid too much sugar, we do still have a social life and we still like to entertain friends. I made this for a garden party we hosted last week for the participants in the biennial Open Gardens Event – a uniquely English institution that is very popular. It was the first weekend of the glorious summer we are having, and we had people from far and wide visiting this year. It was a very successful fundraiser for the village and it is always fun talking about something you love with fellow gardening amoureuses, especially so fo hubby is to be honest the creative force behind the garden.

This was a recipe I found on Patisserie Makes Perfect which is itself an adaptation of William Curley’s recipes for various mousses. I adapted it slightly by making a gluten free joconde sponge from almond flour, which made this recipe completely gluten free though because of the gelatine in virtually every element it is not at all suitable for strict vegetarians.
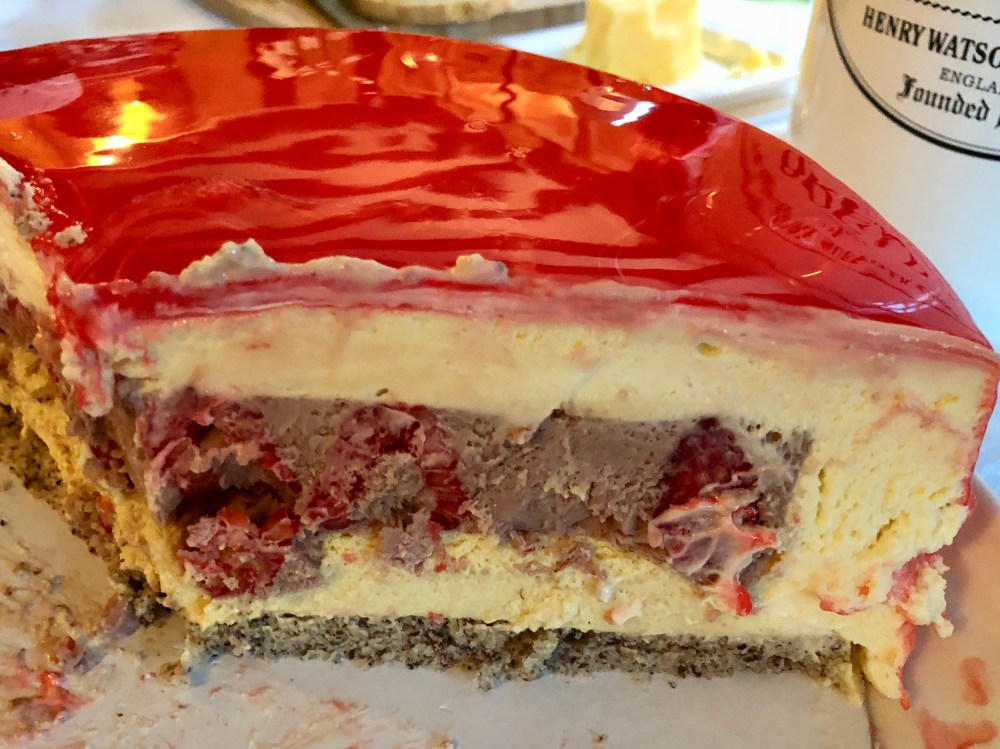
It is a gorgeous combination of hazelnut joconde, topped with honey custard mousse, raspberry curd dotted with fresh raspberries, surrounded by white chocolate bavarois and then glazed with a multi coloured mirror glaze, the latter being another first for me.
Entremets are ideal for this sort of event, as they have the virtue of being able to be made weeks in advance and left in the freezer until the day, when they are then whipped out glazed and allowed to defrost (if only it was really that straight forward). They are also less complicated than they look. At the end of the day they are basically mouses and sponge, so providing you are comfortable making these, then entremets are easily within your grasp. You do however need time to make each of the elements, though you can spread that out over a number of days.
What I personally like less about making these is the uncertainty every time about whether it is going to hold its shape once it defrosts. Right now each of these entremets are being made for the first time, and you really don’t know whether the gelatine quantities are right . In these days of sheet gelatine, recipes tend to talk about sheets of gelatine rather than weight and as sheets definitely vary in size between brands, you just don’t really know what is going to happen. Will there be a gelatinous mess dripping on to the floor when it defrosts or a beautiful silky torte?
This one proved particularly challenging. The Bavarois ended up far too liquid partly because I curdled the custard stage (grrrrrrrr…… I know better) and as I had run out of eggs and time, I had to push it through the liquidiser to de-curdle the mixture with now no hope if thickening (lesson 2 – next time that happens cheat and add cornflour). I then added the whipped cream when the mixture was too hot, resulting in that breaking down as well.

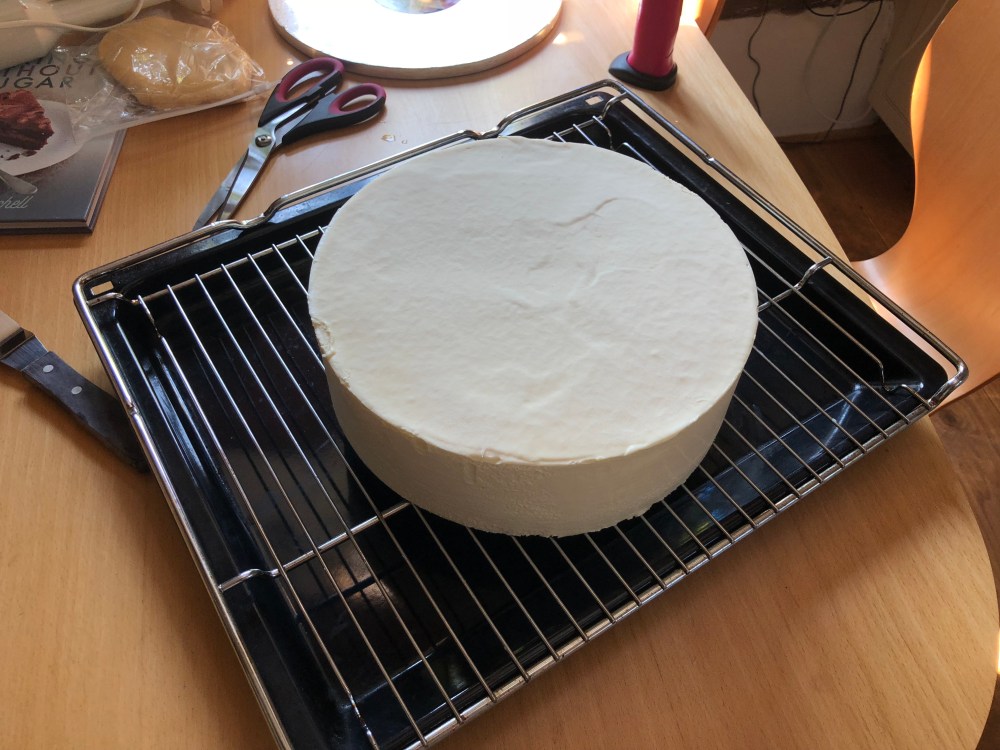
The result was a disaster when I poured the mixture into the unsealed mould and watched it pour out the bottom. The rescue was hideously messy as I scraped the mixture back into a bowl, followed by lifting the mould ring off the torte to let the rest flood out into a pan. I then tried to get a seal on the mould using cling film and poured it all back in and quickly rammed what was now a dripping beast into the freezer to get it set as quickly as possibly. A check 15 minutes later showed that there was still oozing on a lesser scale which required the whole thing to be topped up regularly until the freezer got a grip on it. You will I am sure not be surprised that with all this going on there was no time to take any pictures! Here though is one of the frozen torte just before it got glazed, showing no signs of its difficult birth.
The beloved was less than pleased with the state of the kitchen at the end of this drama, and I was now stressed about whether there was enough gelatine to set the whole thing as normally the whipped cream and custard adds an element of set that reduces the amount of gelatine needed. My way round this is take a spoonful of the mixture and put it in a small bowl int he fridge to see how it sets and this gave me the answer that there would be just enough set, providing we kept the whole thing very chilled. As a consequence I have followed the talented Maren Lubbe’s recipes and added cornflour to the recipe as an extra security blanket.

On top of all of this there was the fun and games of calculating how to move the base recipe up from an 8″ torte to a 10″ one. As ever the increases required are quite startling, but the technique I now use is “simply” to calculate the volume required in milli-litres and then see if the weight of the ingredients comes to the required amount on the assumption that volume and weight are roughly the same (which seems to work for everything except meringue). The perfect entremet needs the slices to be roughly even in width which I didn’t quite succeed in doing but have adjusted the recipes to try to get to the right thickness for each layer.
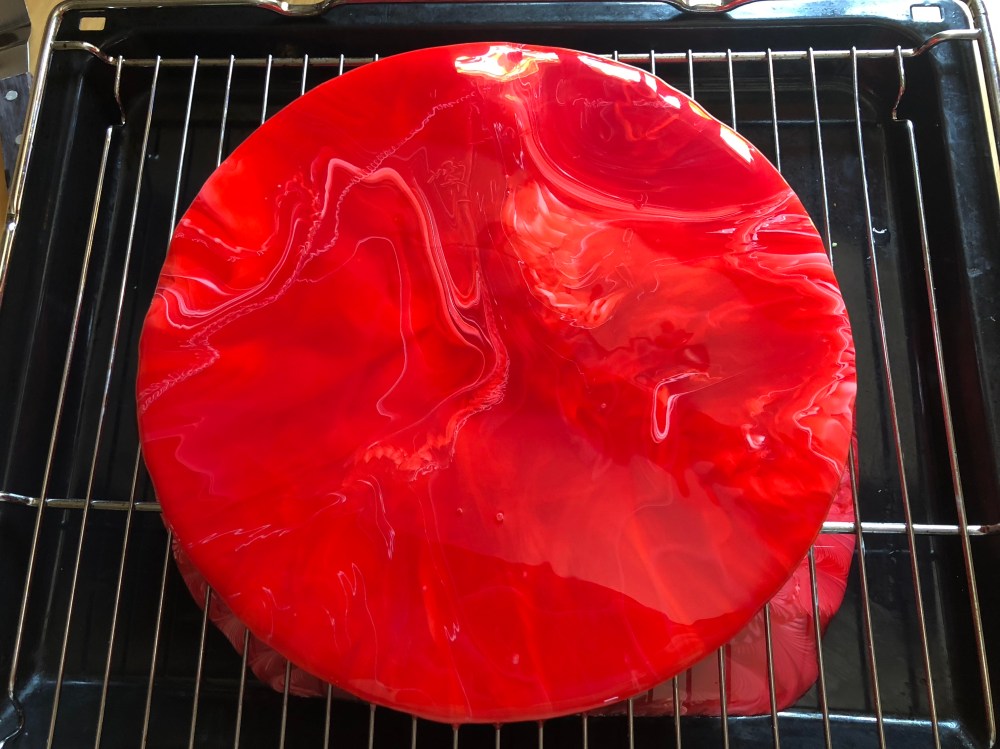
Mirror glaze is another one that I still don’t know how to calculate how much is needed. It can be re-used so making too much is no disaster, though this time I managed to make twice as much as I needed. I just loved the marbling effect and the way it seemed to have three dimensional depth. It is also really easy to achieve which always makes me wonder whose creative brain first came up with these techniques.


The overall torte got a big thumbs up from the party guests and there was absolutely none left at the end of the party.
The Recipe
The original recipe was for an 8′ (20cm) torte, but I made an 10″ (25cm) one. All quantities are for a 10″ torte but I have but 8″ quantities in brackets.
Equipment you need
- 25cm (20cm) mould ring , 8cm high
- 20cm (15cm) mould ring or silicone mould
- food thermometer
- thin cake board for the size of torte you are making
- a kitchen blow torch
- stick blender
The Elements in Order of Preparation
- Honey Custard Mousse
- Raspberry Curd
- Hazelnut Joconde
- White Chocolate Bavarois
- Glaze
Each mousse/curd element takes about 6 hours to freeze so start making this 3 days before you want to serve it.
Honey Custard Mousse
- 8g (5g) leaf gelatine
- 160g (100g) honey
- 1 tsp (2/4tsp) vanilla bean paste
- 420ml (265ml) double cream
- 115ml (70ml) whole milk
- 5 (3) large egg yolks
- 3/4tsp (1/2tsp) salt
- 15g (10g) easter sugar
The Method
- take your 20cm (15cm) mould and place on a board with cling film draped across it
- pull the cling film up the sides of the ring to create a seal around the bottom
- preferably use a silicone mould for this as you are guaranteed no leakage
- mark a line 2.5cm above the base of your mould
- put the gelatine sheets in a bowl of cold water
- heat the honey until it darkest in colour
- take off the heat and whisk in the cream until it is combined
- stir in the milk and whisk until fully combined
- heat until just about to boil and take off the heat
- put the eggs, sugar vanilla bean paste and salt in a bowl and whisk the mixture until it is light in colour
- pour the hot milk and cream mixture onto the eggs whisking as you go
- put the whole mixture back in the pan
- heat very slowly never allowing the mixture to get above 80C (or else it will curdle) until it begins to thicken – usually this happens once it is 80C
- pour your mixture through a sieve to take out any lumps
- squeeze the water out of the gelatine and stir it into your hot mixture until fully dissolved
- pour the mixture into your mould up to 2.5cm (another technique is to mark a toothpick with a line for the required depth and dip it into the mixture toes how deep it is)
- put in the freezer for at least 5 hours until fully frozen


Raspberry Curd
- 4g (2.5g) leaf gelatine
- 130ml (80ml) raspberry puree
- try to buy puree off the shelf/onlne – if not available you need to double the quantities of raspberries pressed through a sieve to get this volume of puree
- 290g (180g) eggs
- 100g (60g) caster sugar
- check your shop bought puree – many have added sugar in them so deduct the amount of added sugar from this quantity but increase the puree quantity to compensate
- 110g (70g) unsalted butter chilled and cubed
- 190g (120g) fresh raspberries
The Method
- select a bowl which can sit on top of a saucepan of boiling water without the bottom touching the water
- bring the pan of water to the boil
- meanwhile in the bowl, whisk the eggs into the raspberry puree and sugar until fully combined
- place the bowl over the pan and stir continuously until it thickens coating the back of a spoon
- take off the heat and press the curd through a sieve to take out any lumps
- squeeze the water out of the gelatine and mix into the curd
- whisk in the butter a small amount at a time until fully combined
- pour into your 20cm (15cm) mould upto a height of 2cm
- place you raspberries in the curd so half are still showing (I singularly failed at this one)
- place in the freezer for 5 hours until frozen solid


Hazelnut Joconde (Courtesy of Mary Berry)
- 2 egg whites
- 10g caster sugar
- 65g ground hazelnuts (or almonds)
- 65g icing sugar
- 2 large eggs
- 20g flour (or sukrin almond flour if you are going gluten free)
- 20g melted butter
The Method
- heat the oven to 220C/ 200C Fan.
- grease and line a baking sheet that is larger than your 25cm (20cm) mould (I use silicone mats these days)
- whisk the egg whites in a bowl until stiff
- add the caster sugar, one teaspoon at a time, whisking between each one
- cover with cling film and set aside
-
put the ground almonds/hazelnuts and icing sugar into the bowl and add the whole eggs
-
whisk together for 3-5 minutes
-
fold in the flour, and then gently fold in the meringue in three separate batches.
-
in a separate bowl take 2 tbsp of batter and add to the melted butter and mix until combined
-
stir the butter mixture into the batter until fully combined
-
spoon the mixture onto the prepared baking sheet and level the surface with a palette knife making sure it is big enough for you cake
-
bake for 5-7 minutes until pale, golden-brown and springy to touch.
-
place a sheet of baking parchment over a cooling rack and turn the cake out onto it.
-
peel off the baking parchment from the base of the cake and leave to cool completely
- once cool cut to a circle 1 cm smaller than your mould – so 24cm (19cm)


White Chocolate Bavarois
- 15g (10g) leaf gelatine
- 600g (425g) white chocolate (chopped)
- 600ml (425ml) whole milk
- 65g (45g) caster sugar
- 150g (105g) egg yolks
- 55g (35g) cornflour (this I have added to the original recipe to guarantee the set)
- 910g (640g) whipping cream
The Method (the part that went a little wrong for me)
- only start this once you know the honey and custard and rapsberry curd is frozen
- put your gelatine in a bowl of cold water
- put the white chocolate in a separate bowl
- put the eggs, sugar and cornflour in a bowl
- in a pan bring your milk to just about to boil and take off the heat
- whisk the egg, sugar and cornflour until pale in colour
- pour the milk onto the egg mixture whisking all the time
- pour it all back into the pan and heat back up whisking all the time until the mixture thickens (like custard) and covers a spoon (never allow it to go above 82C)
- take off the heat
- squeeze the excess water out fo the gelatine, and add the gelatine to your custard
- pour the whole mixture onto the chocolate and stir until the chocolate is fully melted
- pass the mixture through a sieve to remove any remaining lumps
- cover and set aside allowing it to cool to 35C
- now whisk your cream to semi-stiff peaks
- fold into chocolate custard mix until fully combined
- cover and set aside ready for immediate assembly
Assembly
- get a board larger than your mould
- lay a large sheet of cling film across it
- place your joconde sponge on a thin cake board
- take your honey custard mousse out of its mould and put it in the centre of the sponge
- take the raspberry curd out of its mould and put on top of the custard, raspberries pointing up
- put your ring mould around it all and pull the cling film up the side creating a seal
- spoon or pipe your White Chocolate Bavarois to fill the rest of the mould to the top, smoothing the top with a palette knife
- put in the freezer for at least 6 hours until fully frozen


Mirror Glaze
- 10g (6g) leaf gelatine
- 130g (80g) water
- 250g (155g) liquid glucose
- 250g (155g) caster sugar
- 170g (105g) condensed milk
- 250g (155g) white chocolate
- red liquid food colouring
- white liquid food colouring
The Method
- put the gelatine in a bowl of cold water
- add the water, glucose and caster sugar to a pan and heat to 105C
- take off the heat and add the condensed milk
- pour the mixture on the chocolate and blend with your stick blender until smooth
- take about one quarter of the mixture and put in a separate bowl
- add your main colour (in this case white to the bigger bowl), and your marbling colour (in this case white) to the smaller one
- blend using the stick blender making sure at all times the blender never comes above the surface – you are driving out air bubbles when you do this
- whilst doing this, cover the second one with cling film touching the top of the surface to prevent skin forming
- set aside and allow to cool to 35C

Glazing
- have the serving plate for your torte ready
- take your torte out of the freezer, and remove the mould ring
- you will probably need a blow torch blasted around the sides a few times to get the mould to slide off
- set up a baking tray with a cooling rack on top and place a wide tin can on it
- place your cake on top of the can
- pour both your glazes through separate clean sieves into jugs (this removes any final bubbles)
- now pour your smaller colour (white) into the larger one (red) all poured into the same place in the jug
- taking a chop stick , mix very slightly to create a slight marbling in the jug
- now pour confidently over your torte in one smooth action making sure it floods over all sides of the torte
- clean off the drips on the bottom and then carefully lift your torte onto its serving plate
- either allow to defrost out of the fridge for 2 hours, or in the fridge for 6 hours
- slice and serve !


Lieber Stephen, trotz aller Widrigkeiten ist dies eine wunderschöne Torte geworden! Und tatsächlich geht es mir oft genau wie dir. Auch ich bin bei meinen Experimenten nie sicher, ob alles klappt, ob die Mousse fest genug ist oder zu fest und ob die Glasur reicht. Aber nach und nach sammelt man ja Erfahrungen . Und es bleibt spannend … 😉
Herzliche Grüße Maren
Sorry, dass ich in deutsch schreibe, aber mein Englisch ist nicht so besonders gut.
LikeLike
Meine liebe Maren – as with your written English so with my written German. It is a relief to know that my crises of confidence are so similar. Should we be in Schleswig Holstein or your in the UK, it would be lovely to meet in person.
LikeLiked by 1 person
That would be really wonderful!!
LikeLike
Amazing cake!!!!
LikeLike