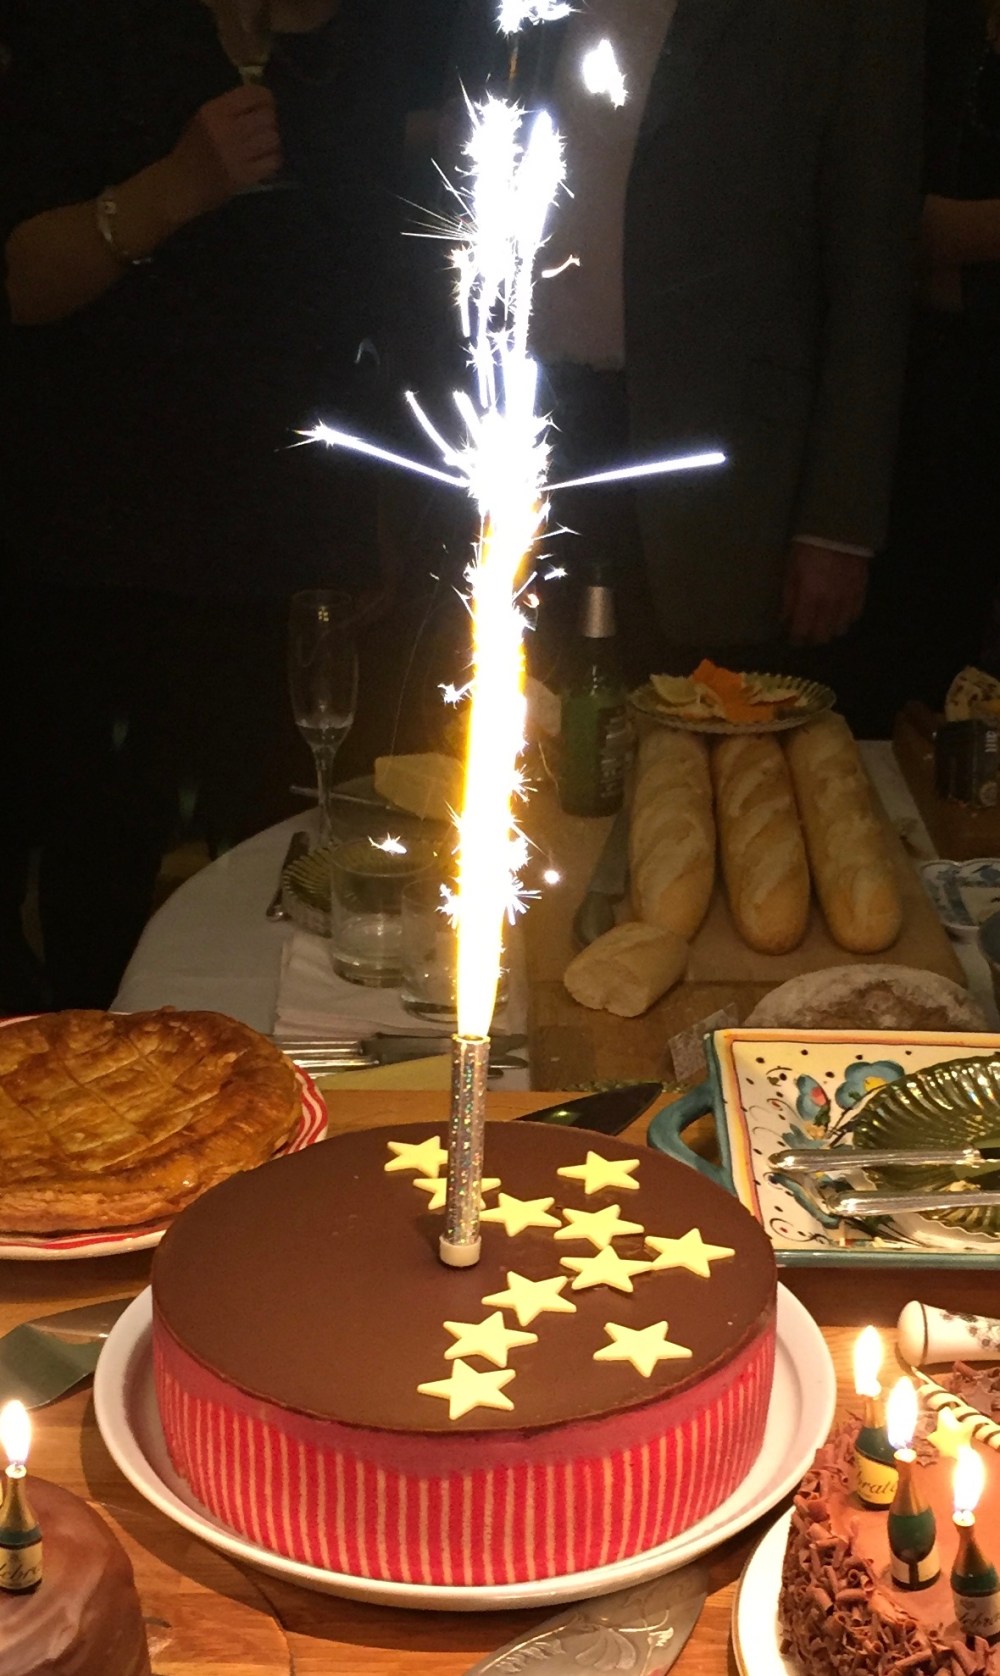
There are times in baking when trying something new, that you are stretched that little bit too much. For New Year’s Eve I decided to make another of Maren Lubbe’s (of Malus Köstlichkeiten) fabulous wonders, a Whisky and Chocolate mousse cake encased in stripy joconde sponge topped off with chocolate mirror glaze. The stripy joconde sponge (officially called Joconde Imprimé) is something I have been wanting to do for a while and with 2 mousse entremets under my belt, I thought this cake would be relatively straightforward. Oh silly silly silly boy ……………was it not. So much so that I have made the cake twice now to try to perfect it – the second time for one of my oldest friend’s birthday with a raspberry and pistachio mousse – which proved just as tricky.

Be warned. This cake is delicious but like the last few bakes I have done, it takes quite a lot of time: at least 5-6 hours end to end plus a bit would be a good estimate. As ever I completely underestimated the effort involved and he who adores me, has started to look at me with highly sceptical eyes when I tell him something will only take a few hours.

Why was this so tricky??? Well there were 3 major stumbling blocks.
The first stumbling block was the cake tin. Maren’s recipe was for an 18cm (7″) cake which is not a size that is very common in the UK. I have a 20cm and 26cm tin which meant increasing the quantities. I have had a number of attempts at increasing and decreasing cake recipes depending on cake tins and whilst the maths (it is all about calculating the volume of a cylinder) is straight-ish forward, somehow the application of that maths has never worked out in the past.
After 2 cakes (one 20cm and one 26cm) I have now become a mathematical genius. If you are a dab hand at Excel then the formula for calculating the volume of a cake (well a cylinder if I am being precise) is PI x radius squared x height. Maren sent me a useful table which shows the increase required when going from a recipe cake size (the measures across the top) to a desired size (the measures along the side). So if you want to convert an 18cm recipe to a 20cm recipe you increase all the quantities by a factor of 1.23. For a 26cm tin you increase by a factor of 2.08.

Please be warned this table only works if everything is the same height. Once the height changes, the increase factor grows dramatically. 1cm extra height means that an 18cm recipe has to increased by a factor of 2.6 if you want to convert it to a 26cm tin This link gives a handy converter which takes both weight and height into account and enables you to convert an entire recipe. Alternatively get the calculator and apply Pi r squared x height and quiver at the memory of school maths exams.
The second stumbling block is the Joconde Imprimé which frankly is the most tricky part of this recipe. You make it by first mixing up a thick paste, spreading it thinly and then dragging a decorating (or tile adhesive) comb through it. This is then frozen whilst you make a joconde sponge mix which is spread over the combed paste and then baked. All of this sounds simple in theory. In practice it is not. Not only is it a messy job, but getting the lines straight is very hard especially as the comb is not the width of the sponge so has to be pulled through a number of times whilst ensuring the stripe is still neat and straight especially at the edges of each drag.


What I have learned is this:
- the Imprimé paste is easiest spread and worked on a silicone mat rather than baking parchment.
- getting the lines straight requires dragging your comb with confidence and speed applying equal pressure across the length of the comb.
- It needs to be spread thinly so that the paste does not spread too much in the bake, thereby obliterating the stripes altogether.
I also worked out why an 18cm (7″) tin is so much more sensible. A single large roasting/baking tin size produces what you need – going larger means you need to do more than one sheet of joconde, which starts to get very time consuming. On my second cake just making the sponge took most of an evening after work.


The last stumbling block was that you need to have the 2 slices of mousse the same depth to keep a balance of flavour and appearance. On the first attempt (as you can see from the pictures), I completely under estimated the impact of slightly increasing the height of the cake which completely undermined my ingredient quantity calculations. This meant when I realised the problem I had to radically increase the amount of chocolate mousse in order to fill the cake. Getting it right the second time took a lot of calculating and adjusting but I got there in the end (with a whole 2 litres of mousse!)


Before I put you off, there is a major upside to all of this. Both cakes are delicious and the basic principle of a joconde sponge with 2 slices of mousse has limitless variations. So try them out.
Good luck and happy baking.
The Recipe
Equipment
- 20cm mousse ring
- silicone baking mat
- decorating or adhesive comb
- 8cm high acetate to line the mousse ring
- 2 silicone baking mats (42cm x 30cm)
- 9″ cake board
Ingredients and Method
I have reproduced below all the mousse recipes I used in both cakes. The first cake has whisky and chocolate mousse, the second cake has pistachio and raspberry mousse. Feel free to play with any flavour combinations you fancy but make sure you have about 0.7l of each mousse.
For the Joconde Imprimé, the paste is quite thick. If doing a colour you can replace the cocoa with gel colouring and extra flour. If using gel colouring I would advise breaking up the gel with some of the paste first making it easier to combine with the rest of the paste.
Lastly on fruit puree, I bought some online as it works out much cheaper than buying fresh fruit. However it tends to come pre-sweetened and I noticed that of the 2 brands I bought both have different levels of sugar added to them. Check the pack and reduce the sugar in these recipes by the amount of sugar that the manufacturer has added.
The order of play is
- make the imprimé paste, create the stripes and freeze
- make the joconde sponge and then spread over the stripes
- bake for about 15 minutes
- cool and cut to size, and line the tin with the joconde
- make the first mousse and put in the cake and put in freezer to set (about an hour)
- make the second mousse, add to cake and put in freezer to set (about an hour)
- make your glaze and pour over top and allow to set
- put on your cake stand, remove the mould and acetate, decorate and serve
Joconde Imprimé Paste
- 100g Unsalted Butter (melted)
- 95g Icing Sugar
- 3 Egg Whites (Medium)
- Either (for coloured version)
- 80g Flour
- Pink Food Colouring
- Or (for the chocolate version)
- 70g Flour
- 10g Cocoa
Method
- Sift the icing sugar into the melted butter and stir until smooth
- Sieve the flour (and cocoa) onto the paste and stir in until smooth
- If colouring take some of the mixture and mix it into the gel colouring to thin it down an then combine back into the paste until fully coloured
- put 1/3rd of the mixture into another bowl
- take one of the mats and spread a thin (2-3mm) layer of the paste on the mat large enough to be able to cut 2 circles out of (42cm x 25cm) – effectively the whole mat
- drag your comb though the paste to form neat straight lines
- on the other mat spread enough paste to cover an area 35cm x 15cm – you will be using this for your strips of sponge around the cake
- drag your comb though the paste to form neat straight lines so the lines run down the short side of the rectangle
- place mats in the freezer and start the joconde sponge


Joconde Sponge
- 5 Egg Whites (large)
- 65g Caster Sugar
- 100g Ground Almonds
- 2 Eggs (large)
- 3 Egg Yolks (large)
- 110g Plain Flour
- 30g Unsalted Butter (melted)
Method
- heat your oven to 190C / 170C Fan
- whisk the egg whites until they start to stiffen
- while beating add the sugar a spoonful at a time and carry on beating until stiff
- in a separate bowl combine the almonds, egg yolks and eggs and whisk until light and creamy
- fold in the egg whites until it is fully combined carefully preserving the air
- sieve the flour on top of the mixture and fold in
- take 2 spoonfuls of the mixture and stir it into the melted butter
- fold the butter mixture back into the main mixture
- put 1/3rd of the mixture into a separate bowl
- spread the mixture over the paste stripes
- bake in the oven for 10-15 minutes
- take out of the oven
- place a sheet of baking parchment on top of the sponge slice
- place a cooling rack on top
- flip the whole stack over so the cooling rack is face down
- peel off the silicone mat and allow to cool


Assembly Stage 1
- from the smaller piece cut 2 strips of sponge 5.5cm high – combined they need to be just over 64cm
- scatter your cake board with ground almonds (it helps the cake not stick to the board)
- place your mousse ring on the board
- line with the acetate strip
- place your 2 long thin strips around the edge with the stripes facing outwards
- make sure you have a tight fit at the joins by overlapping the joins and then cut through, removing the piece at the back
- from the large piece of sponge cut 2 circles 20cm each
- cut away a further small amount (amount half the depth of the sponge strips below)
- place one piece inside your mousse mould with the stripes facing upwards
- mark on your acetate strip which way the vertical lines are in your mould (I use a bulldog clip – this is important for later)
- set aside and make the mousse


The combination of mousses is up to you. The recipes here are either
- Whisky on the bottom, and chocolate on the top
- Pistachio on the bottom, and raspberry on the top
Bottom Layer Mousse
Option 1 – Pistachio Mousse
- 4 Sheets of Gelatine
- 300g Full Fat Milk
- 1.5 tsp Vanilla Extract
- 26g Cornflour
- 2 Egg Yolks (large)
- 60g Caster Sugar
- 50g Pistachio Paste
- 160g Whipping Cream
Option 2 – Whisky Mousse
- 4 Sheets of Gelatine
- 300g Full Fat Milk
- 2 tsp Vanilla Extract
- 26g Cornflour
- 2 Egg Yolks (large)
- 45g Caster Sugar
- 50g Whisky
- 160g Whipping Cream
Method
The method is very similar for both these mousses. You make a creme patissiere, add the flavouring (whisky or pistachio paste), stir in the gelatine, and then fold in whipped cream and pour into your cake.
- put the gelatine in a bowl of cold water
- put the milk and vanilla extract in a pan and bring to just about to boil
- put the egg yolks and sugar together and whisk until light
- whisk in the cornflour
- add some of the milk and stir and then slowly add the rest of the milk
- heat up until the mixture thickens, no hotter than 85C
- press through a sieve
- add your flavouring (whisky or pistachio paste)
- squeeze the water out of the gelatine and stir in until it is dissolved
- wait for creme pat mixture to cool to 40C
- whip your cream to soft peaks
- fold the cream into the creme pat mixture
- pour into your cake
- now place the second sponge piece on top of the mousse, stripes down, making sure they are facing the same way as the bottom piece (that is why you marked the acetate earlier – it ensures the stripes run the same way when you cut a slice to serve)
- put in the freezer


Top Layer Mousse
Option 1 – Raspberry Mousse
- 4 Sheets of Gelatine
- 160g White Chocolate
- 50g Caster Sugar
- 290g Raspberry Puree (buy double the weight in fresh raspberries to get this)
- 220g Whipping Cream
Method
- soak your gelatine sheets in a bowl of cold water
- chop your chocolate into small pieces
- put the puree and sugar into a pan and heat to 60C until the sugar is dissolved
- squeeze the water out the gelatine and stir into the raspberries
- pour over the chocolate
- blend mixture until smooth
- wait for mixture to cool to 40C
- whip your cream to soft peaks
- fold into the raspberry and chocolate mixture
- pour into your cake
- put in freezer


Option 2 – Chocolate Mousse
- 3 Sheets of Gelatine
- 130g Full Fat Milk
- 65g Single Cream
- 2 Egg Yolks (Large)
- 30g Caster Sugar
- 205g Dark Chocolate
- 300g Whipping Cream
Method
- soak your gelatine sheets in a bowl of cold water
- chop your chocolate into small pieces
- put in a small bowl over pan of simmering water and melt the chocolate
- put the milk and cream into a plan and bring to just under the boil
- put the egg yolks and sugar in a bowl and whisk until light
- pour on the hot milk gradually stirring all the time
- put it all back in the pan and gently heat until it thickens to a custard like consistency (no hotter than 85C)
- press through a sieve
- squeeze the water out of the gelatine and stir into the custard until dissolved
- add the mixture to the melted chocolate
- wait for mixture to cool to 40C
- whip your cream to soft peaks
- fold into the chocolate mixture
- pour into your cake


Chocolate Glaze
- 2 Sheets of Gelatine
- 80g Caster Sugar
- 60g Water
- 15g Cocoa
- 60g Single Cream
Method
- soak the gelatine in a bowl of cold water
- put the sugar and water in a pan and bring to the boil
- allow to cool to 80C and add the cocoa and cream
- squeeze out the gelatine and add to the mixture and stir until dissolved
- blend until everything is fully combined keeping the blender head beneath the surface to avoid bubbles being added
- pour through a sieve
- cover with cling film touching the surface
- allow to cool to 35C
- pour confidently over the cake and allow to cool


Chocolate Swirls
For these you need to temper chocolate. Follow the video instructions from Evelin Wilde – a German Chocolatiere – that beat any description I can give. Don’t shortcut the chocolate tempering stage though. I managed to make some the second time that collapsed.


Oh oh, das klingt ja wie ein Krimi… oder ein Drama? 😉 Ich hoffe aber, dass sich die Arbeit gelohnt hat und ihr die Torten genossen habt.
Herzliche Grüße
Maren
LikeLike
Bei mir ist backen immer ein bisschen dramatisch! (and for my English readers Maren said the post sounded like a crime novel or just a drama – to which I said baking with me is always a bit dramatic!)
LikeLiked by 1 person
I did so enjoy your post and photos. If ever you have room for another best fiend, do let me know.
LikeLike
Sorry, that’s best friend. 🙃
LikeLike
Oh I could be both fiend and friend 🙂 Thank you for your comments – always glad someone out there is enjoying the blog
LikeLike
Another 2 fabulous creations and very good blog to read . What next?
Annie G
LikeLike
There is a rather lovely mango, raspberry mousse done and yuzu tartlet to be written up soon and a birthday cake for my niece is being planned with military precision. After that there needs to be a bit of a rest.
LikeLike
I like your detailed descriptions
LikeLike
Thank you. I really need to get the blog active again.
LikeLike